CD, CD Çalar, DVD, DVD Çalar, SACD, LP, Plak Çeşitleri ve Fiyatları

In this tutorial, we demonstrate how to sketch out compelling chords without any music theory knowledge using WaveDNA’s Liquid Music. Chord progression software can play a crucial role in your workflow. We show you how.
Not every producer is a music theory expert. We all have our areas of focus. Some of us are mixing wizards, some can program drums like no one else, and some know how to turn a crate-digging session into a solid boom-bap beat. There may come a time, though, when you need to write a harmony or melody to match a stem or loop in a certain key. That’s where a chord assistant program can help save the day.
Liquid Music by WaveDNA is one such plugin. It allows you to sketch out a musical idea and then tweak the key, chord voicing, rhythm and other elements.
We’re using it to create a chord progression to match a vocal sample in a UK garage track. All of the samples in this tutorial came from the Splice pack, MJ Cole’s House & Garage Essentials Sample Pack.
As always, click any image to see a larger version.
We’ll go from this vocal sample:
To this finished track:
[advert]
Overview Of Liquid Music
Liquid Music is a MIDI-assist music application. (Liquid Rhythm, which is included when you buy Liquid Music, does a similar thing but for beats). There are many who may already be familiar with Liquid Music. WaveDNA were one of the pioneers of MIDI-assisted music applications around 2009 onwards. In recent years there has been an explosion of competitors to Liquid Music including Captain Chords and Scaler. Most were inspired by the work of WaveDNA and with a long overdue update to the software unleashed in December, it felt right to revisit it.
It connects to your DAW via a bridge, which you load into a project as a plugin. Clicking on the plugin opens the application, which then runs in sync with your DAW as a MIDI controller device.
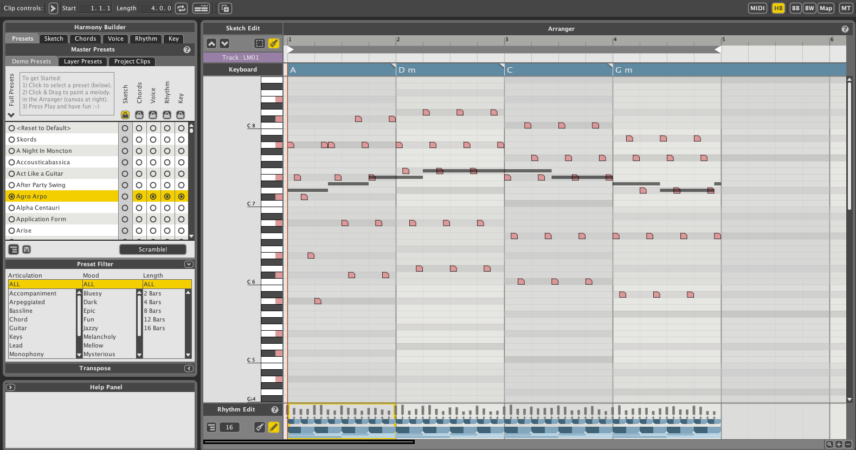
As you’d expect for a program like this, it can get fairly deep—deeper, in fact, than we have space to explain here. However, it can be helpful to think of it as a harmony-focused sequencer. Across the top is the Tool Bar, to the right is the Arranger Canvas, and to the left is the Harmony Builder.
Unlike most DAWs that you may be used to, there’s very little actual touching of the notes in the Arranger Canvas. Once you’ve sketched out your idea (see below), you’ll be doing the rest of your work in the Harmony Builder. Here you can adjust the chords themselves, chord voicing, the rhythm of the chords, and key, as well as sketch out the shape of the melody should you not want to do it manually. This is all done by calling up presets and tweaking them.
Once you’re satisfied with your harmony or melody, you can leave it as is or drag the MIDI file directly into your DAW for additional adjustments.
[advert]
Setup For Ableton Live
As WaveDNA is a separate application that interfaces with a host program, the setup is a little different depending on your DAW. Here’s how to do it as a plugin in Ableton Live. (For other DAWs, see the manual.)
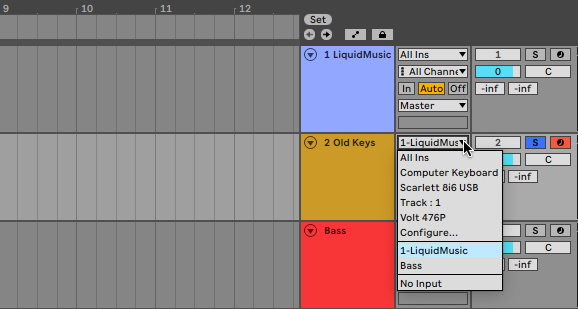
Start by creating a new MIDI track in Live. Call up an instance of WaveDNA on the empty track.
Next, load up an instrument to control on a new MIDI track. Change the MIDI input from All Ins to the Liquid Music track.
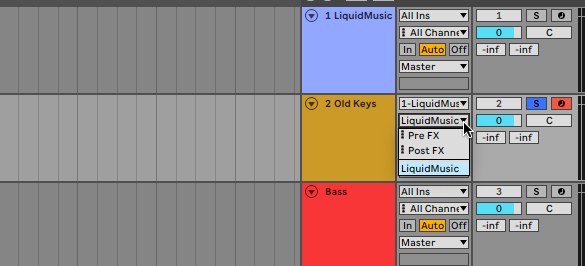
In the dropdown menu directly below it (with Pre FX and Post FX slots), be sure and also select Liquid Music. Make sure to arm the channel as well.
[advert]
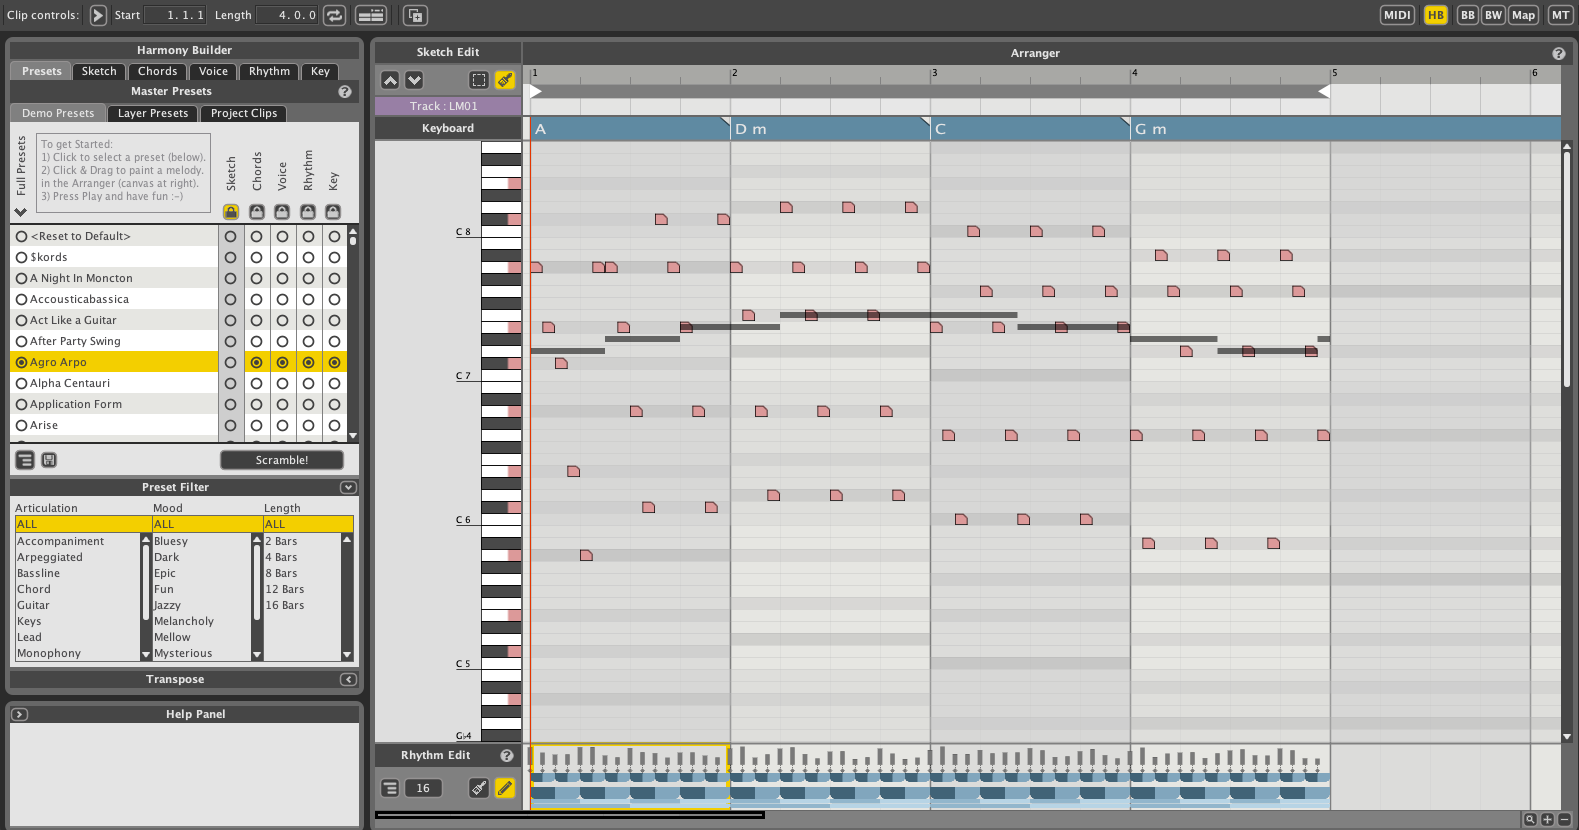
Step 1: Sketch A Melodic Progression
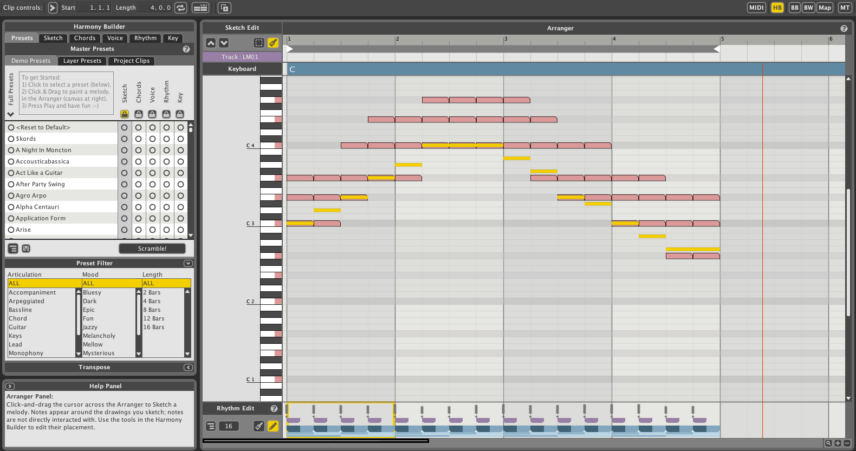
Open Liquid Music from within your DAW and hover your cursor over the Arranger Canvas. You should see the cursor change to a paint brush icon. With this, you can sketch a harmonic progression. Choose a general octave and decide how you want the progression to flow. Don’t worry about the details too much, as you can always change things later. We’ve gone for an up/down feel.
How the initial chord sketch sounds triggering Analog in Ableton Live:
[advert]
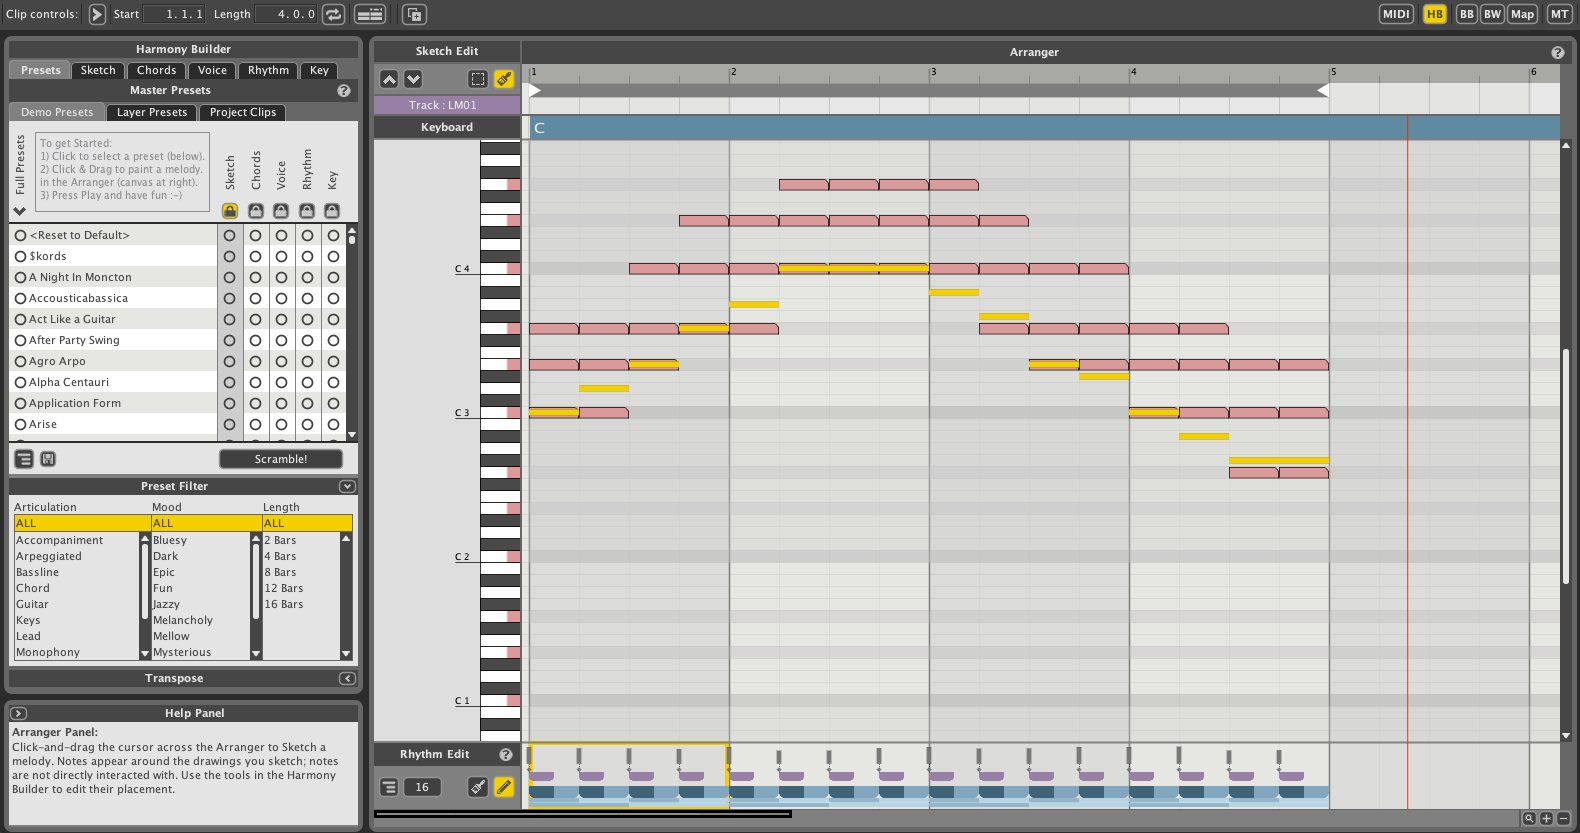
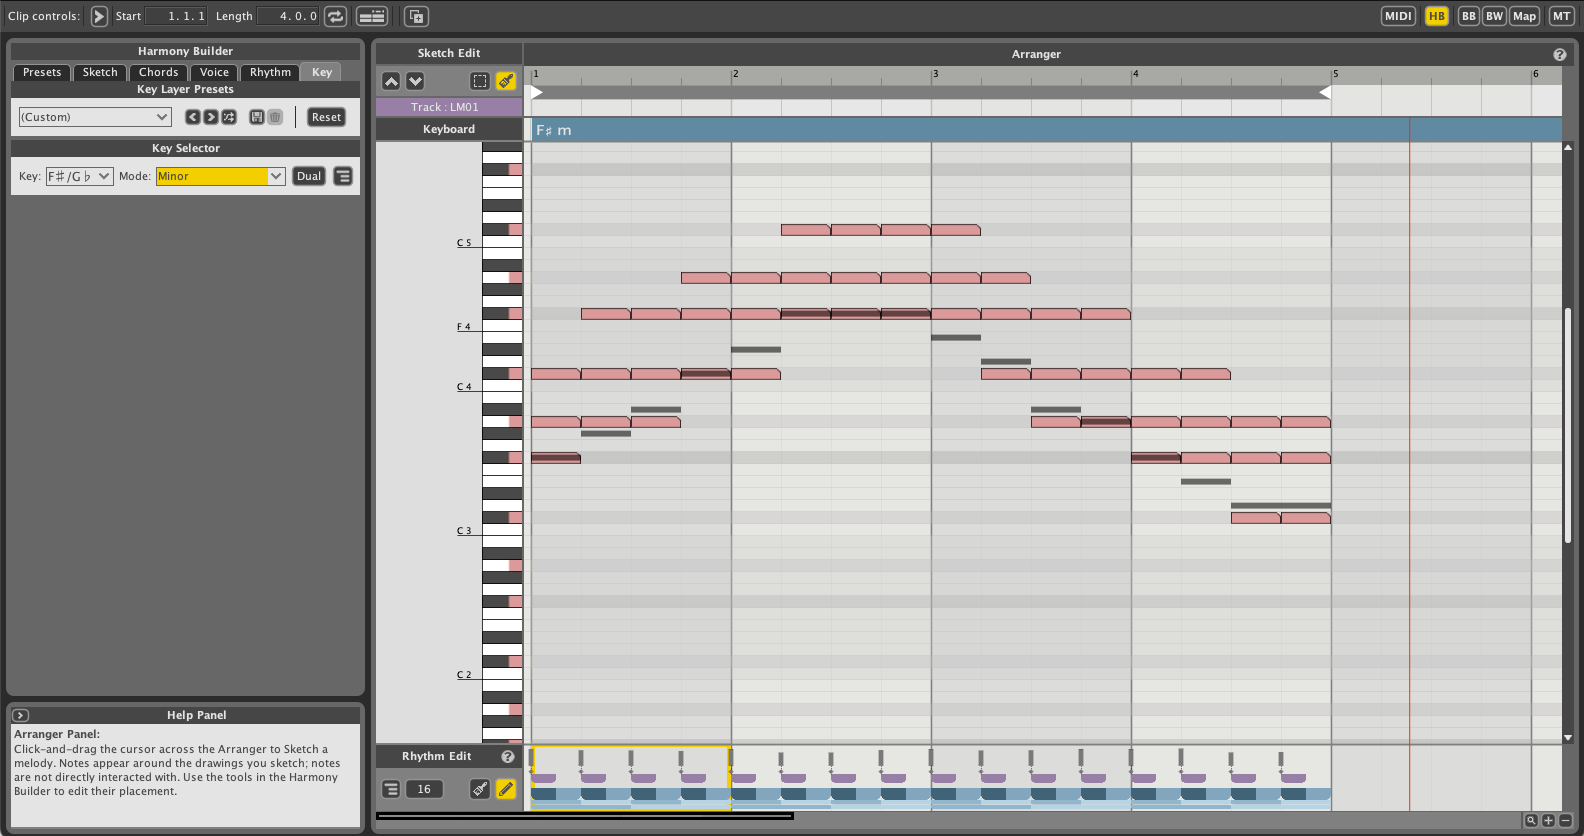
Step 2: Setting The Harmonic Key
Click on the Key tab at the top of the Harmony Builder on the left. You can see that the key is set to the default, C major. We need to change it to match the vocal sample, which is F# minor. We go ahead and make those changes in the Key Selector area. The notes in the Arranger Canvas change automatically to match your selection.
The same chords now in F# minor:

[advert]
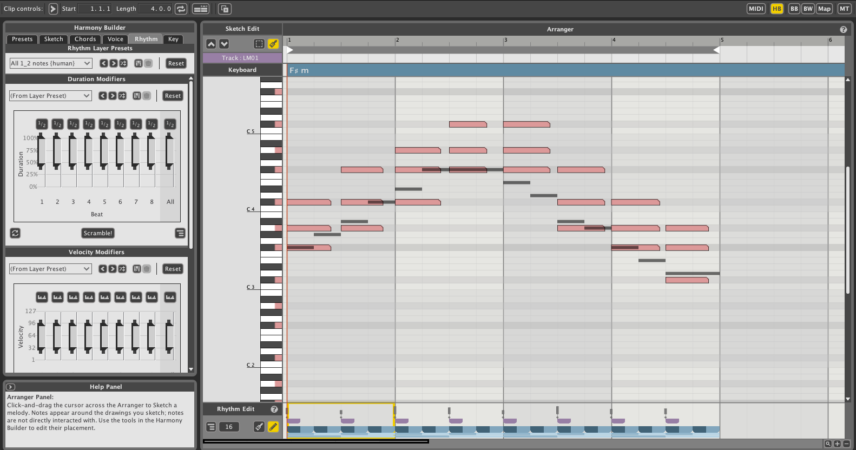
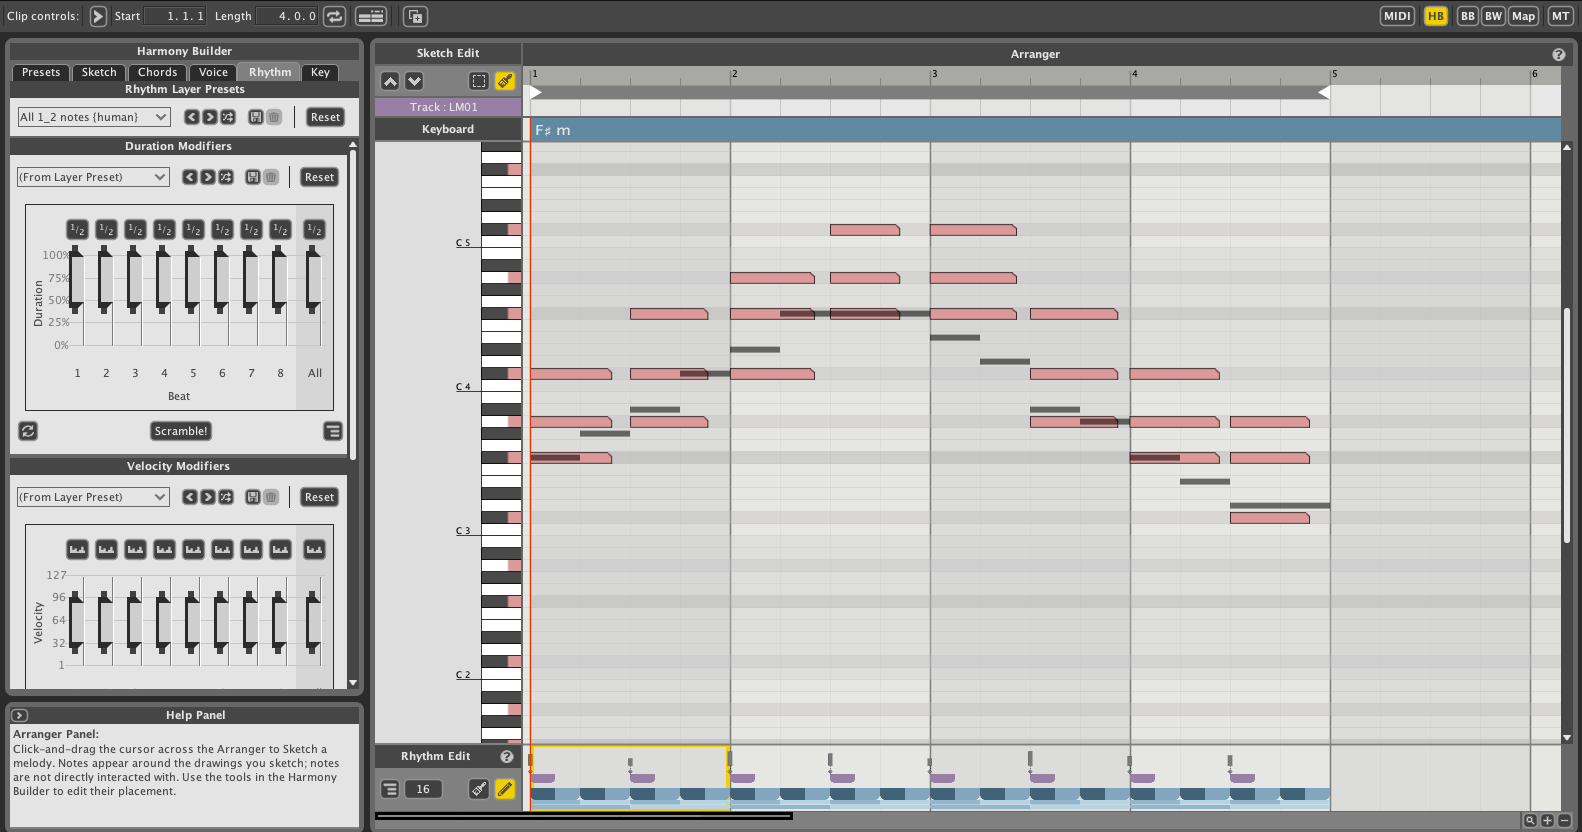
Step 3: Adjusting The Rhythm
Let’s set the rhythm of the chords next. They’re currently playing in quarter notes, which is not what we want. We’re going for something a little sparser, a chord progression with space in it that will allow the bassline to take center stage. To facilitate this, click on the Rhythm tab and select the preset, All 1/2 notes (human). Now they’re playing half as often.
Half-note chords:
[advert]
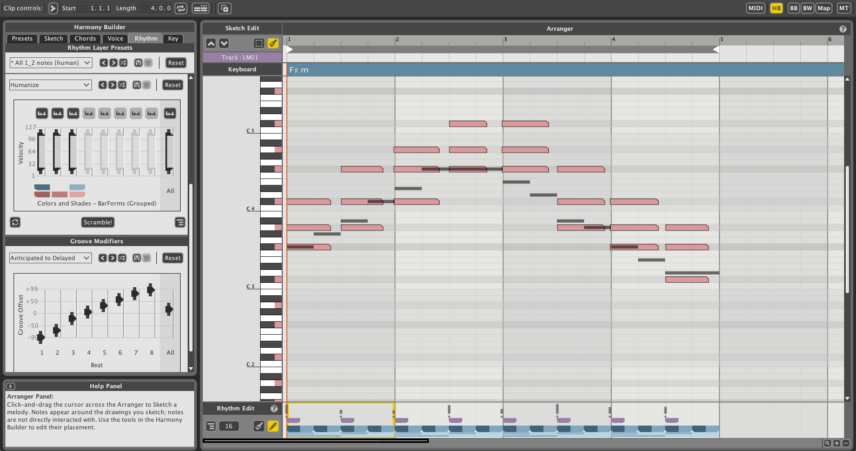
Step 4: Tweaking the Velocity and Groove
The Rhythm section also offers control over duration, velocity and groove. Use the presets and sliders in the Modifiers sections to make further changes. The notes are already fairly short so you can ignore the Duration section. Under Velocity, choose Humanize to change up the velocity slightly. Similarly, the Anticipated to Delayed preset in the Groove Modifiers area offsets the start of the notes a little, giving it a less robotic feel.
With new adjustments:
[advert]
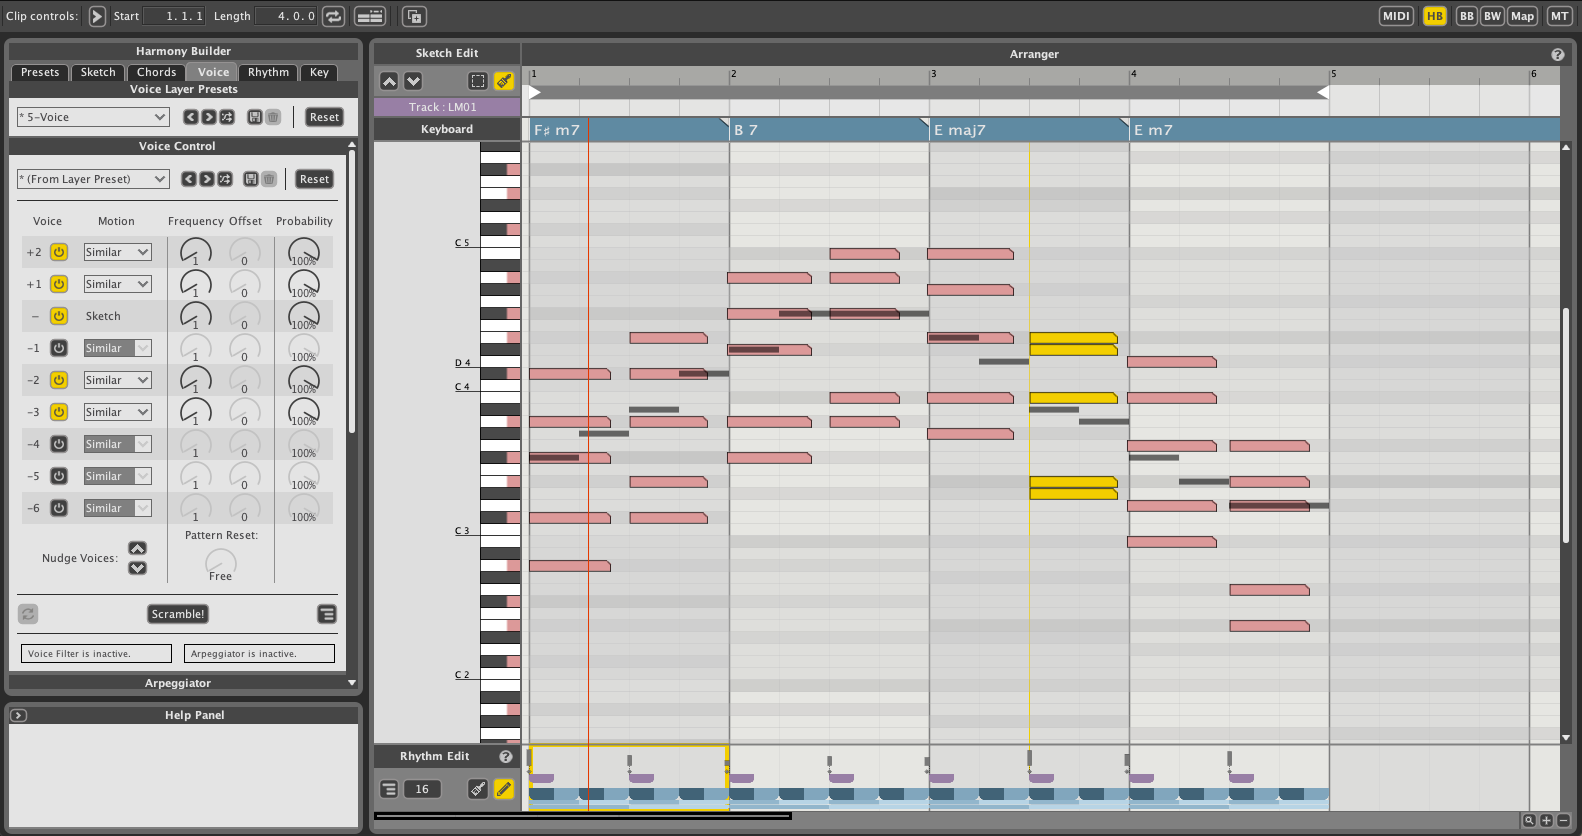
Step 5: Choosing New Chords
The rhythm and groove are coming along but the chord selection is a little uninspired. Let’s get some different chords happening.
Head over to the Chords tab. Liquid Music offers a number of different ways to choose chords. You can start with a progression outright, or add them one by one. Let’s have Liquid Music suggest the chord progression. Start by looking at the Suggester section and going with the Jazzy preset. You can then move through the chart, selecting and auditioning chords as you go. The progression of F# m7 -> B7 -> E maj7 -> E m7 sounds good.
New suggested jazzy chords:

[advert]
Step 6: Making More Complex Chords
So far, there have been nothing but triads, or chords with three notes. This is fine for some genres, but UK garage, especially the jazzy kind, often uses more complex clusters of notes. Let’s address this in the Voice section.
Start with the Voice Layer Presets and choose 5 – Voice, for chords with five notes. (If you wanted to make a bassline or melody, you would choose 1 here.)
Next, move down to the Voice Control area. Here you can add and subtract notes from the chords. In this way, you can space the notes farther apart. The chords are a little high so let’s remove some notes from above the root and add them below. You can also use the Nudge buttons to move the root note higher or lower in the stack.
Five-note chords:

[advert]
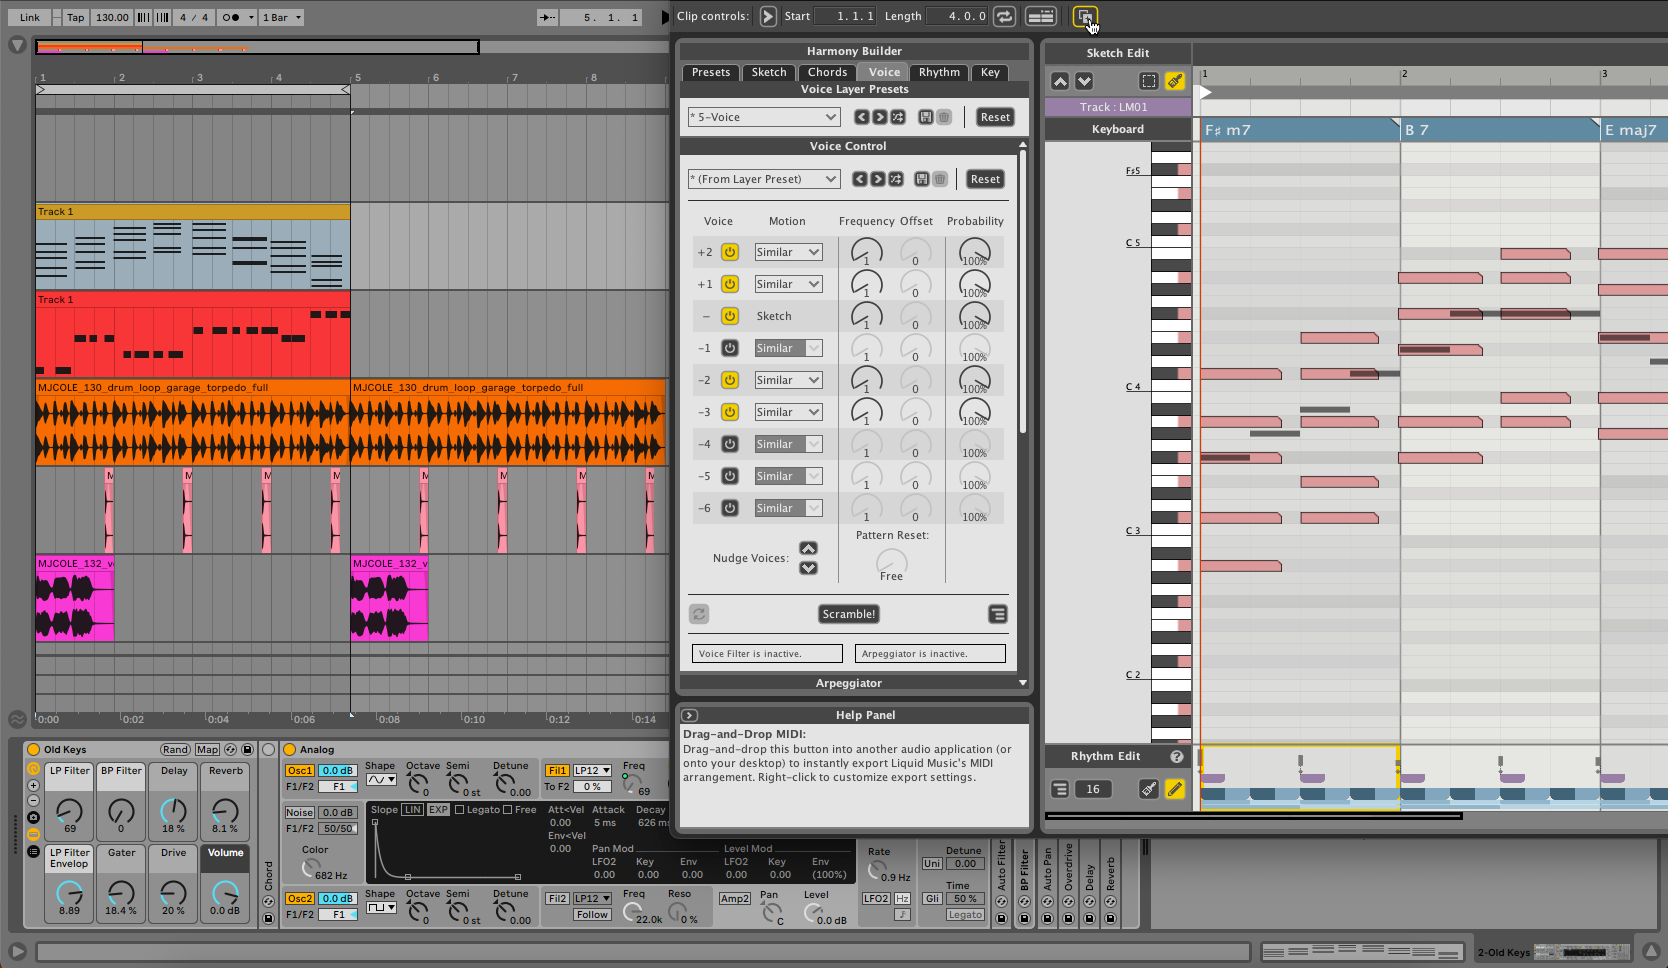
Step 7: Export MIDI File
This sounds good, so let’s export the chords as a MIDI file. Click on the icon in the Transport section of Liquid Music and then drag the file to the same MIDI track in Live. Finally, switch the MIDI input back to All Ins on the target MIDI track.
You can make further adjustments to the MIDI in Live if you wish.

Here’s the finished track with a bassline created with Liquid Music in the same way:
Want to learn how to sequence melodies with Liquid Music? Be sure to check out Attack’s tutorial.
[product-collection id=”123922″]
attackmagazine
In this tutorial, we demonstrate how to sketch out compelling chords without any music theory knowledge using WaveDNA’s Liquid Music. Chord progression software can play a crucial role in your workflow. We show you how.
Not every producer is a music theory expert. We all have our areas of focus. Some of us are mixing wizards, some can program drums like no one else, and some know how to turn a crate-digging session into a solid boom-bap beat. There may come a time, though, when you need to write a harmony or melody to match a stem or loop in a certain key. That’s where a chord assistant program can help save the day.
Liquid Music by WaveDNA is one such plugin. It allows you to sketch out a musical idea and then tweak the key, chord voicing, rhythm and other elements.
We’re using it to create a chord progression to match a vocal sample in a UK garage track. All of the samples in this tutorial came from the Splice pack, MJ Cole’s House & Garage Essentials Sample Pack.
As always, click any image to see a larger version.
We’ll go from this vocal sample:
To this finished track:
[advert]
Overview Of Liquid Music
Liquid Music is a MIDI-assist music application. (Liquid Rhythm, which is included when you buy Liquid Music, does a similar thing but for beats). There are many who may already be familiar with Liquid Music. WaveDNA were one of the pioneers of MIDI-assisted music applications around 2009 onwards. In recent years there has been an explosion of competitors to Liquid Music including Captain Chords and Scaler. Most were inspired by the work of WaveDNA and with a long overdue update to the software unleashed in December, it felt right to revisit it.
It connects to your DAW via a bridge, which you load into a project as a plugin. Clicking on the plugin opens the application, which then runs in sync with your DAW as a MIDI controller device.
As you’d expect for a program like this, it can get fairly deep—deeper, in fact, than we have space to explain here. However, it can be helpful to think of it as a harmony-focused sequencer. Across the top is the Tool Bar, to the right is the Arranger Canvas, and to the left is the Harmony Builder.
Unlike most DAWs that you may be used to, there’s very little actual touching of the notes in the Arranger Canvas. Once you’ve sketched out your idea (see below), you’ll be doing the rest of your work in the Harmony Builder. Here you can adjust the chords themselves, chord voicing, the rhythm of the chords, and key, as well as sketch out the shape of the melody should you not want to do it manually. This is all done by calling up presets and tweaking them.
Once you’re satisfied with your harmony or melody, you can leave it as is or drag the MIDI file directly into your DAW for additional adjustments.
[advert]
Setup For Ableton Live
As WaveDNA is a separate application that interfaces with a host program, the setup is a little different depending on your DAW. Here’s how to do it as a plugin in Ableton Live. (For other DAWs, see the manual.)
Start by creating a new MIDI track in Live. Call up an instance of WaveDNA on the empty track.
Next, load up an instrument to control on a new MIDI track. Change the MIDI input from All Ins to the Liquid Music track.
In the dropdown menu directly below it (with Pre FX and Post FX slots), be sure and also select Liquid Music. Make sure to arm the channel as well.
[advert]
Step 1: Sketch A Melodic Progression
Open Liquid Music from within your DAW and hover your cursor over the Arranger Canvas. You should see the cursor change to a paint brush icon. With this, you can sketch a harmonic progression. Choose a general octave and decide how you want the progression to flow. Don’t worry about the details too much, as you can always change things later. We’ve gone for an up/down feel.
How the initial chord sketch sounds triggering Analog in Ableton Live:
[advert]
Step 2: Setting The Harmonic Key
Click on the Key tab at the top of the Harmony Builder on the left. You can see that the key is set to the default, C major. We need to change it to match the vocal sample, which is F# minor. We go ahead and make those changes in the Key Selector area. The notes in the Arranger Canvas change automatically to match your selection.
The same chords now in F# minor:
[advert]
Step 3: Adjusting The Rhythm
Let’s set the rhythm of the chords next. They’re currently playing in quarter notes, which is not what we want. We’re going for something a little sparser, a chord progression with space in it that will allow the bassline to take center stage. To facilitate this, click on the Rhythm tab and select the preset, All 1/2 notes (human). Now they’re playing half as often.
Half-note chords:
[advert]
Step 4: Tweaking the Velocity and Groove
The Rhythm section also offers control over duration, velocity and groove. Use the presets and sliders in the Modifiers sections to make further changes. The notes are already fairly short so you can ignore the Duration section. Under Velocity, choose Humanize to change up the velocity slightly. Similarly, the Anticipated to Delayed preset in the Groove Modifiers area offsets the start of the notes a little, giving it a less robotic feel.
With new adjustments:

[advert]
Step 5: Choosing New Chords
The rhythm and groove are coming along but the chord selection is a little uninspired. Let’s get some different chords happening.
Head over to the Chords tab. Liquid Music offers a number of different ways to choose chords. You can start with a progression outright, or add them one by one. Let’s have Liquid Music suggest the chord progression. Start by looking at the Suggester section and going with the Jazzy preset. You can then move through the chart, selecting and auditioning chords as you go. The progression of F# m7 -> B7 -> E maj7 -> E m7 sounds good.
New suggested jazzy chords:

[advert]
Step 6: Making More Complex Chords
So far, there have been nothing but triads, or chords with three notes. This is fine for some genres, but UK garage, especially the jazzy kind, often uses more complex clusters of notes. Let’s address this in the Voice section.
Start with the Voice Layer Presets and choose 5 – Voice, for chords with five notes. (If you wanted to make a bassline or melody, you would choose 1 here.)
Next, move down to the Voice Control area. Here you can add and subtract notes from the chords. In this way, you can space the notes farther apart. The chords are a little high so let’s remove some notes from above the root and add them below. You can also use the Nudge buttons to move the root note higher or lower in the stack.
Five-note chords:
[advert]
Step 7: Export MIDI File
This sounds good, so let’s export the chords as a MIDI file. Click on the icon in the Transport section of Liquid Music and then drag the file to the same MIDI track in Live. Finally, switch the MIDI input back to All Ins on the target MIDI track.
You can make further adjustments to the MIDI in Live if you wish.
Here’s the finished track with a bassline created with Liquid Music in the same way:
Want to learn how to sequence melodies with Liquid Music? Be sure to check out Attack’s tutorial.
[product-collection id=”123922″]