CD, CD Çalar, DVD, DVD Çalar, SACD, LP, Plak Çeşitleri ve Fiyatları

In the Synth Secrets we show you how to make Hannah Laing’s rave smash, ‘Be The One’ using Twin 3 FabFilter’s new synth.
DJ and producer, Hannah Laing, has steadily ascended in profile since her first release almost a decade ago.
The Dundee-born artist has established herself as a provider of high-energy techno and house cuts with certified dancefloor-filling credentials. She has released on labels such as Solardo’s Sola, Patrick Topping’s TRICK and Spinnin’ Records. A good resume by any standard.
On Boxing Day 2022, Laing dropped one of her finest achievements to date, the rave anthem Be The One. This behemoth of a banger is built around a face-smashing bass riff endlessly looping throughout the track. It’s the rhythmic and melodic backbone and the subject of this edition of Synth Secrets. We’ll be recreating that bass line with FabFilter’s new synth the Twin 3.
Here’s what we’re making:
And here it is in the context of a tune:
As ever click any image to enlarge!
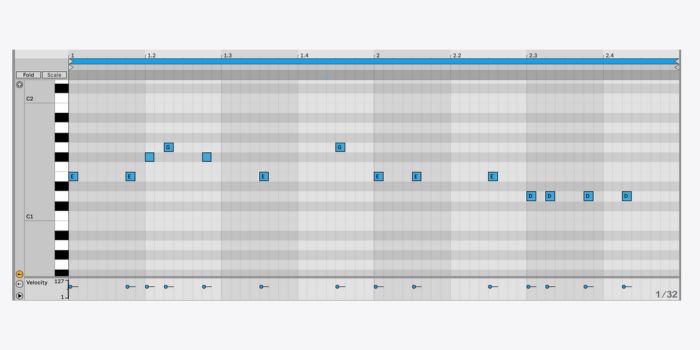
Step 1: MIDI
Begin by creating an empty MIDI track and programming the below MIDI pattern:
[advert]
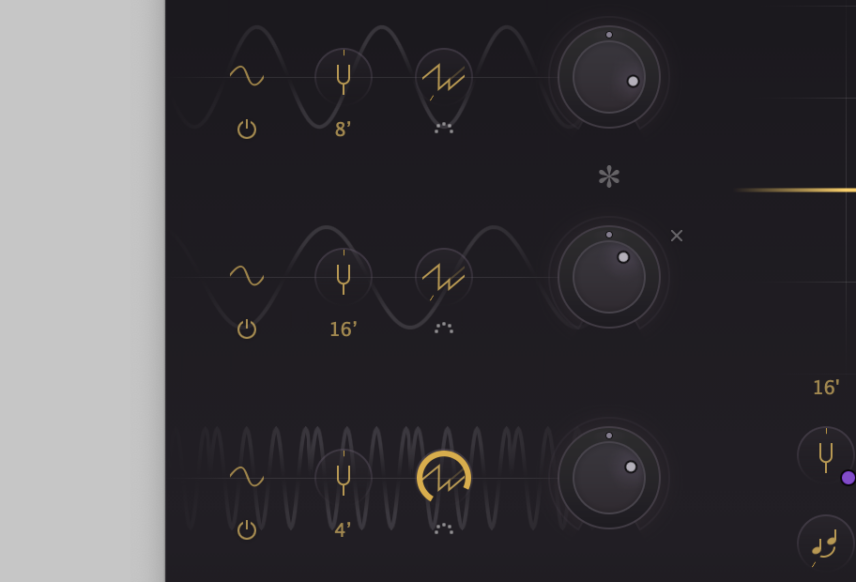
Step 2: Oscillators
Next, load Twin 3 on the MIDI channel. We’ll begin the patch by programming the oscillators. This sound requires three oscillators.
Set oscillator one to sine with a tuning of +1 octaves and a level of -6dB.
Set oscillator two to sine with a tuning of +0 octaves and a level of -13.7dB.
Set oscillator three to sine with a tuning of +2 octaves and -5 semitones, Osc Sync to 3.4 and level to -10.4dB.
This is what it should sound like so far:
[advert]
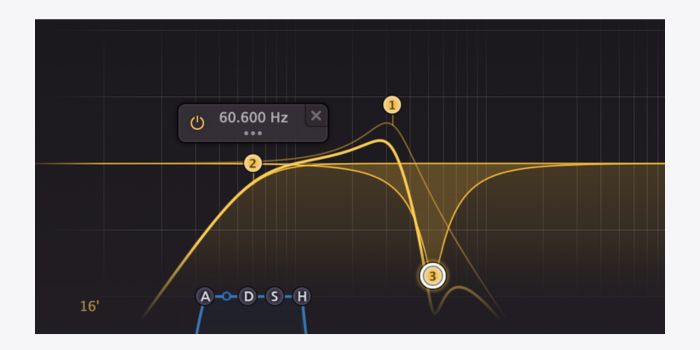
Step 3: Filters and Envelope
Set a low pass filter at 324.5 Hz with a peak of 0.44, the Hollow filter type and a slope of 12 dB/oct.
Add a Classic high pass filter at 60.6 Hz with a 12 dB/oct slope.
Add a Hollow bell cut at 528.3 Hz, a gain of -0.846 and a Wide bell shape.
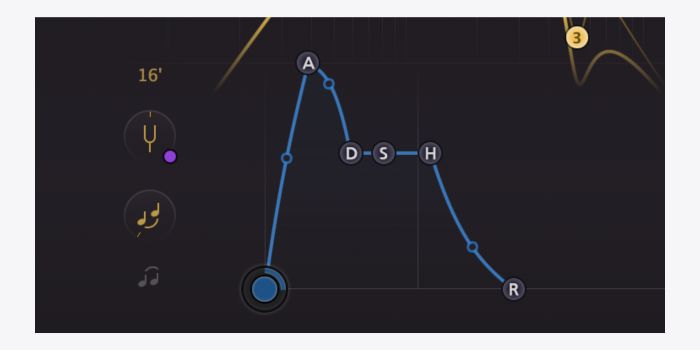
Now for the amplitude envelope.
- Set an attack of 3.73 ms with a slope of 0.22
- A decay 62.86 ms with a slope of -0.74
- A sustain of -4.4 dB; a hold of 34.2 ms
- A release of 155.2 ms with a slope of 0.5.
This is what it should sound like so far:
[advert]
Step 4: Modulation
Modulation time. Create a New Envelope Generator, set an attack of 4.85, a 0dB sustain, and a release of 401 ms.
Assign the envelope to modulate filter 1. Set the EG Level to 0.53 and the Slot Level to 0.04.

This is what it should sound like so far:
[advert]
Step 5: Effects
Finally, we’ll apply some effects to fine-tune the sound.
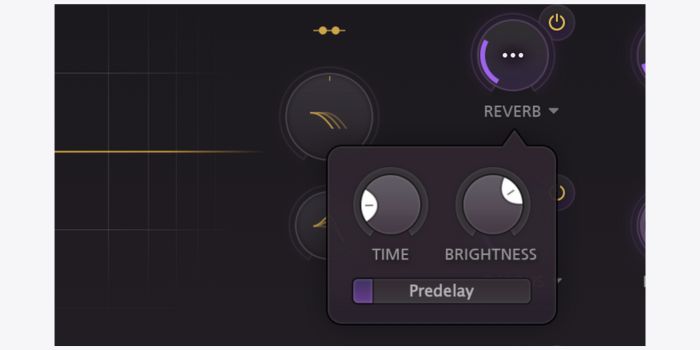
Set the Reverb Amount to 8.9% with a time of 727 ms, brightness of 68.5% and a pre delay of 1.53 ms.
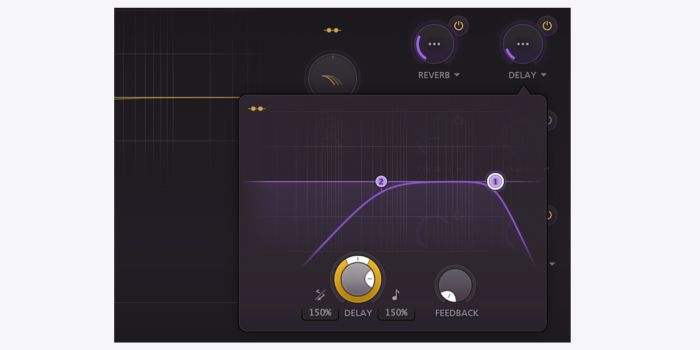
Set Delay Amount to 2.16% with a 150% (dotted) delay offset, 0% feedback, a high pass filter at 409 Hz and low pass filter at 23047 Hz.
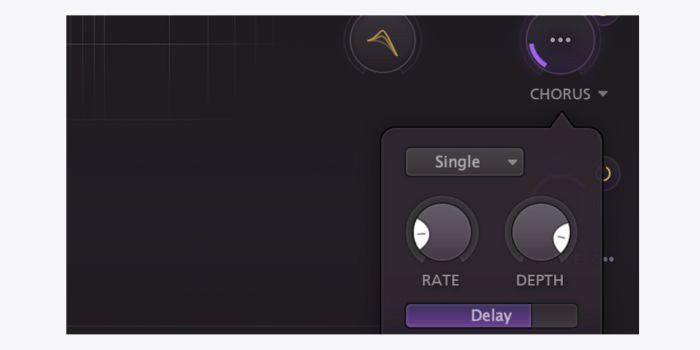
Set Chorus Amount to 3.13% with a rate of 0.078 Hz, a depth of 85% and a delay of 15 ms. Make sure the chorus is in single mode.
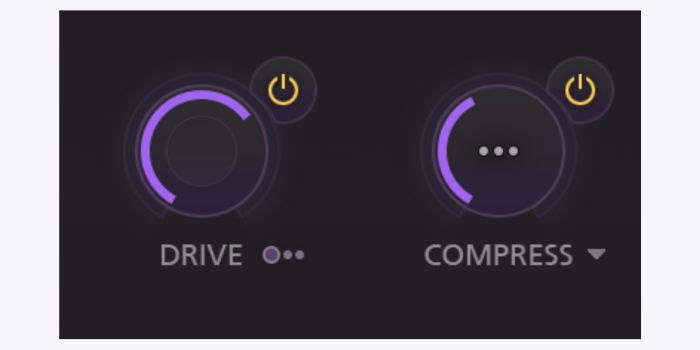
Set the Drive to 45.7% and ensure its routing is set to Pre FX.
Set the Compress Amount to 17%.
To perfect the sound further we’ll use some external processing.
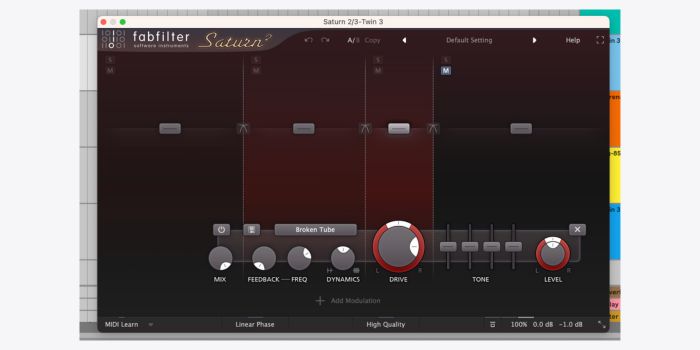
First up, load FabFilter’s Saturn 2. Saturn 2 allows us to apply multiband saturation with different saturation models and amounts on each band. Create four bands: band 1 from 0 to 98 Hz, band 2 two from 98 to 662 Hz, band 3 from 662 to 1910 Hz and band 4 from 1910 Hz to 20000 Hz.
Apply Warm Tape saturation to band 1 with 20% drive, Warm Tape saturation to band 2 with 65% drive and Broken Tube saturation with 80% drive to band three.
Next load the Crew Cut preset for Ableton’s Saturator and roll the Drive back to 21 dB.
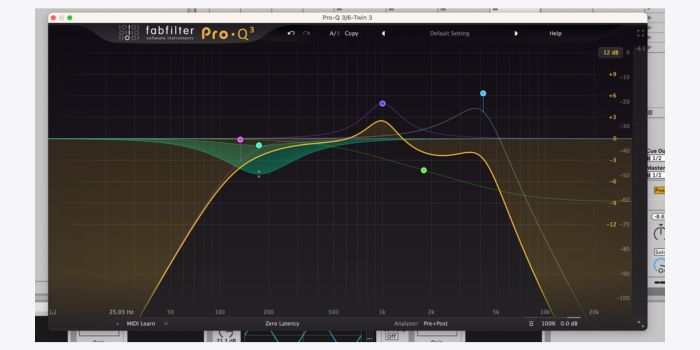
Finally load FabFilter Pro Q 3. You can use Ableton’s stock EQ here, however we will be using dynamic bands so Pro Q 3 is preferable.
Set a low pass filter at 133.8 Hz and a slope of 12 dB/oct. Create a dynamic bell band at 174 Hz with a cut of -.94 dB and a dynamic range of -4 dB. Create a 4.9 dB bell boost at 1001 Hz, a high shelf at 1793 with a cut of -8.83 dB and a low pass at 4152 Hz with a Q of 2.176.
Here is our final sound!
If you like this Synth Secrets, you may enjoy:
- Remaking James Holdens – ‘The Sky Was Pink’
- Remaking Effy – ‘Not Yours’.
[social-links heading=”Follow Attack Magazine” facebook=”https://www.facebook.com/attackmag” twitter=”https://twitter.com/attackmag1″ instagram=”https://www.instagram.com/attackmag/” youtube=”https://www.youtube.com/user/attackmag” soundcloud=”https://soundcloud.com/attackmag” tiktok=”https://www.tiktok.com/@attackmagazine”]
attackmagazine
In the Synth Secrets we show you how to make Hannah Laing’s rave smash, ‘Be The One‘ using Twin 3 FabFilter’s new synth.
DJ and producer, Hannah Laing, has steadily ascended in profile since her first release almost a decade ago.
The Dundee-born artist has established herself as a provider of high-energy techno and house cuts with certified dancefloor-filling credentials. She has released on labels such as Solardo’s Sola, Patrick Topping’s TRICK and Spinnin’ Records. A good resume by any standard.
On Boxing Day 2022, Laing dropped one of her finest achievements to date, the rave anthem Be The One. This behemoth of a banger is built around a face-smashing bass riff endlessly looping throughout the track. It’s the rhythmic and melodic backbone and the subject of this edition of Synth Secrets. We’ll be recreating that bass line with FabFilter’s new synth the Twin 3.
Here’s what we’re making:
And here it is in the context of a tune:
As ever click any image to enlarge!
Step 1: MIDI
Begin by creating an empty MIDI track and programming the below MIDI pattern:
[advert]
Step 2: Oscillators
Next, load Twin 3 on the MIDI channel. We’ll begin the patch by programming the oscillators. This sound requires three oscillators.
Set oscillator one to sine with a tuning of +1 octaves and a level of -6dB.
Set oscillator two to sine with a tuning of +0 octaves and a level of -13.7dB.
Set oscillator three to sine with a tuning of +2 octaves and -5 semitones, Osc Sync to 3.4 and level to -10.4dB.

This is what it should sound like so far:
[advert]
Step 3: Filters and Envelope
Set a low pass filter at 324.5 Hz with a peak of 0.44, the Hollow filter type and a slope of 12 dB/oct.
Add a Classic high pass filter at 60.6 Hz with a 12 dB/oct slope.
Add a Hollow bell cut at 528.3 Hz, a gain of -0.846 and a Wide bell shape.
Now for the amplitude envelope.
- Set an attack of 3.73 ms with a slope of 0.22
- A decay 62.86 ms with a slope of -0.74
- A sustain of -4.4 dB; a hold of 34.2 ms
- A release of 155.2 ms with a slope of 0.5.
This is what it should sound like so far:
[advert]
Step 4: Modulation
Modulation time. Create a New Envelope Generator, set an attack of 4.85, a 0dB sustain, and a release of 401 ms.
Assign the envelope to modulate filter 1. Set the EG Level to 0.53 and the Slot Level to 0.04.
This is what it should sound like so far:
[advert]
Step 5: Effects
Finally, we’ll apply some effects to fine-tune the sound.
Set the Reverb Amount to 8.9% with a time of 727 ms, brightness of 68.5% and a pre delay of 1.53 ms.
Set Delay Amount to 2.16% with a 150% (dotted) delay offset, 0% feedback, a high pass filter at 409 Hz and low pass filter at 23047 Hz.
Set Chorus Amount to 3.13% with a rate of 0.078 Hz, a depth of 85% and a delay of 15 ms. Make sure the chorus is in single mode.
Set the Drive to 45.7% and ensure its routing is set to Pre FX.
Set the Compress Amount to 17%.
To perfect the sound further we’ll use some external processing.
First up, load FabFilter’s Saturn 2. Saturn 2 allows us to apply multiband saturation with different saturation models and amounts on each band. Create four bands: band 1 from 0 to 98 Hz, band 2 two from 98 to 662 Hz, band 3 from 662 to 1910 Hz and band 4 from 1910 Hz to 20000 Hz.
Apply Warm Tape saturation to band 1 with 20% drive, Warm Tape saturation to band 2 with 65% drive and Broken Tube saturation with 80% drive to band three.
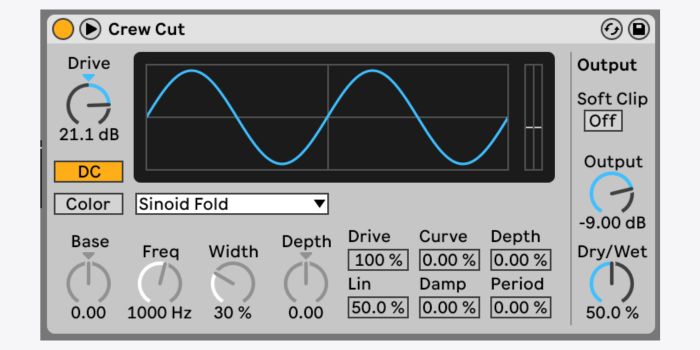
Next load the Crew Cut preset for Ableton’s Saturator and roll the Drive back to 21 dB.
Finally load FabFilter Pro Q 3. You can use Ableton’s stock EQ here, however we will be using dynamic bands so Pro Q 3 is preferable.
Set a low pass filter at 133.8 Hz and a slope of 12 dB/oct. Create a dynamic bell band at 174 Hz with a cut of -.94 dB and a dynamic range of -4 dB. Create a 4.9 dB bell boost at 1001 Hz, a high shelf at 1793 with a cut of -8.83 dB and a low pass at 4152 Hz with a Q of 2.176.
Here is our final sound!
If you like this Synth Secrets, you may enjoy:
- Remaking James Holdens – ‘The Sky Was Pink’
- Remaking Effy – ‘Not Yours’.
[social-links heading=”Follow Attack Magazine” facebook=”https://www.facebook.com/attackmag” twitter=”https://twitter.com/attackmag1″ instagram=”https://www.instagram.com/attackmag/” youtube=”https://www.youtube.com/user/attackmag” soundcloud=”https://soundcloud.com/attackmag” tiktok=”https://www.tiktok.com/@attackmagazine”]