CD, CD Çalar, DVD, DVD Çalar, SACD, LP, Plak Çeşitleri ve Fiyatları

In this Synth Secrets, we’ll recreate some of the jungle’s most iconic and oft-used samples from scratch using Zebra2.
Sure, you can use a sample. There are so many sample companies now you’re spoilt for choice. But if everyone else is, why not learn to do it from scratch? Then you can genuinely tweak it and make it your own. We’re going to get as close as possible to the exact sound of some classic dub sirens deployed across countless jungle, drum and bass, and garage tracks.
It’s a useful exercise in getting loads of vibe and color out of digital, virtual synthesizers. Ultimately, building the sample in a synth can open the sound up in huge ways.
Let’s start with one of our favorites, a sound popularized by DJ Gunshot’s 1996 track “Wheel Up.” Listen for its first appearance at the six-second mark and then again at nine seconds.
WhoSampled tells us that the sound has been sampled in 44 songs, but we all know that’s a massive underestimate! That sample has been featured in jungle, drum and bass, and garage tracks closer to 4,400 times over the years!
Here’s what we’re building:
And this is how it sounds in the context of a full composition:
We will use u-he’s powerful Zebra2 for all of our synthesis and effects. If you haven’t yet tried the Zebra family of synthesizers, download a demo here and thank us later. We’ll be using Ableton Live as our DAW but of course these concepts translate to your DAW of choice.
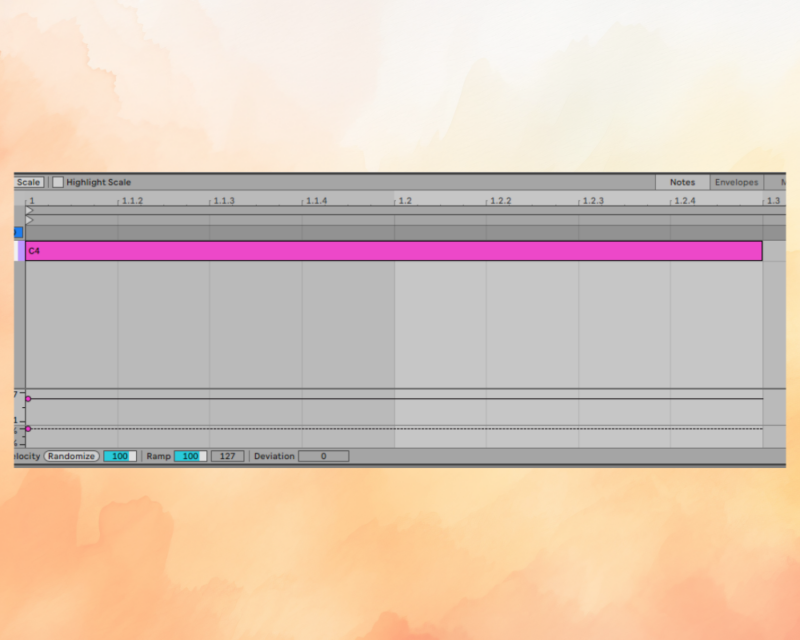
Set your DAW’s BPM to 174, punch this MIDI sequence in (yes… it’s just one note, and that’s C4 – yes it’s explosive), and let’s get going.
Step 1: Setting the Foundation
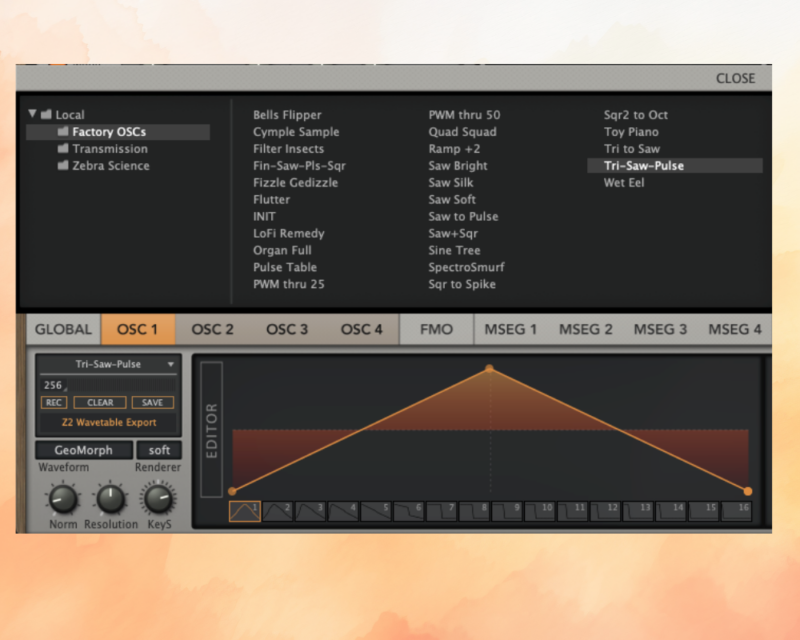
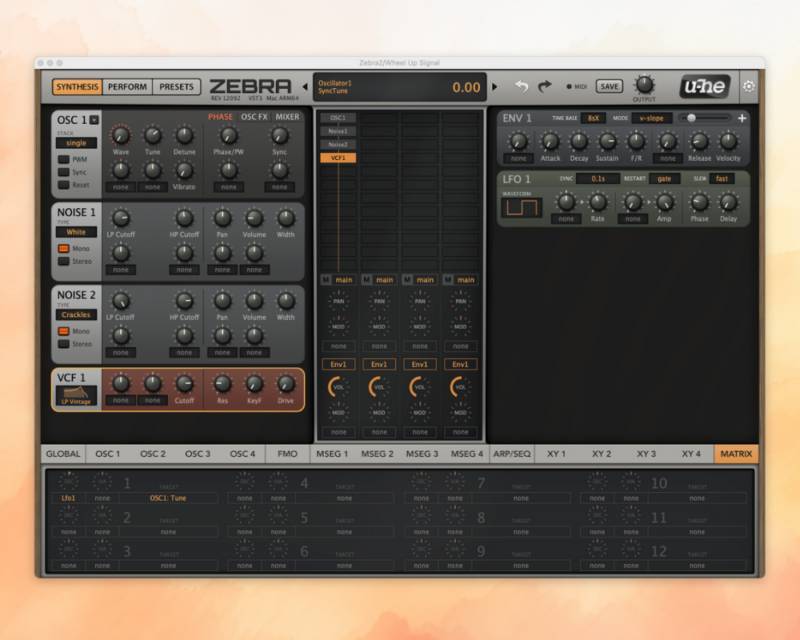
Start by initializing the patch. Now move to the bottom of the interface where the GLOBAL tab is highlighted and select the OSC1 tab. In the waveform selector which starts off with none selected, switch to the Tri-Saw-Pulse setting.
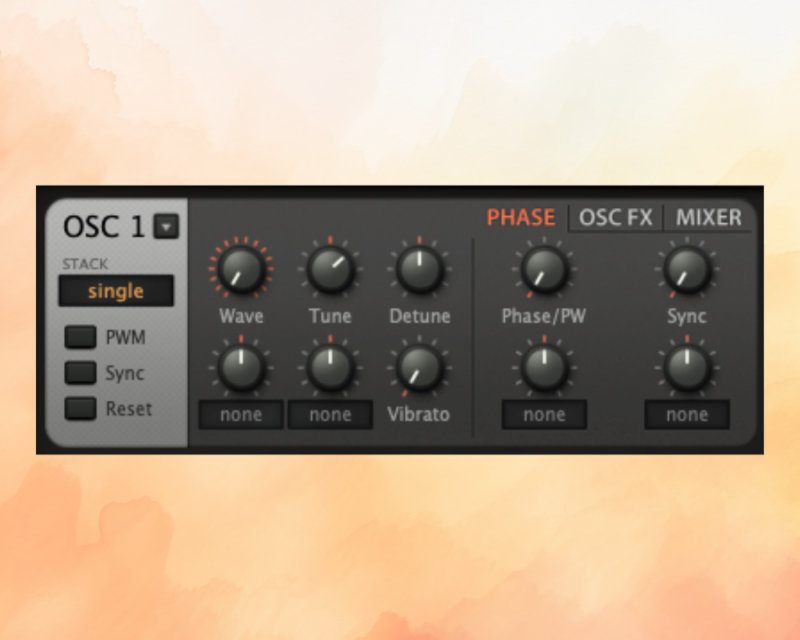
Then set Tune to 15.5 so when we hit middle C we get the pitch we want.
Progress so far = next to nil, but just wait…
Step 2: Sirens On
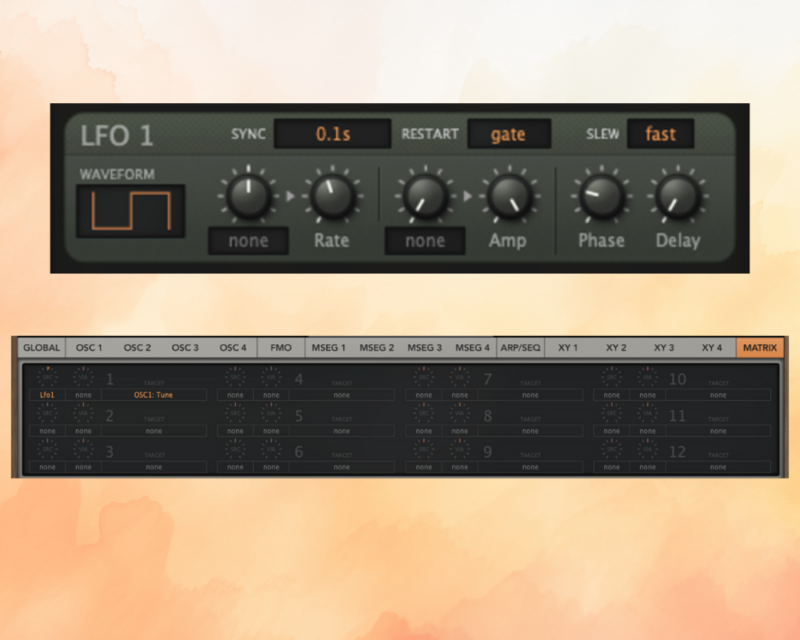
Now let’s get some rapid gratification. On the right side, head over to the LFO1 module and start by changing the waveform to sqr lo-hi. Then change Sync to 0.1s, set Restart to gate, Rate down to 88, and Phase to 25.
Then click on the Matrix tab to call up the mod matrix and route Lfo1 to osc1:tune Then turn the amount knob up to 8.
Now we can start to hear where we’re going.
Step 3: A Touch of Dirt
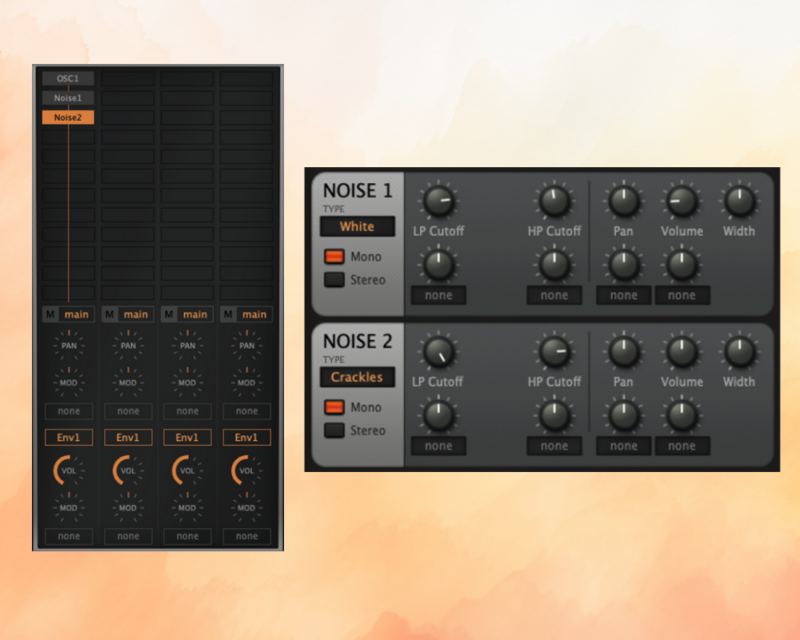
In the main grid we’re going to click on an empty cell beneath OSC1 and select Noise1 from the menu. Repeat once more to create another noise generator. The first one will give us some gritty tape hiss and the second a subtle crackle to make the sound feel like it was lifted from vinyl.
On the Noise 1 module’s controls, turn LP cutoff down to about 3 o’clock and turn HP cutoff to about 12 o’clock, shaving off the highs and lows to get a vintage midrange vibe. Turn the volume down to about 9 o’clock.
On Noise 2, change the mode from white to crackles. Turn HP cutoff up to 3 o’clock. This is one subtle change that will add up in the end.
Step 4: More Tone Shaping
Back on the main grid, add VCF 1 to a cell beneath the noise generators. Change the filter type from LP Excite to LP Vintage, turn the cutoff down to 3 o’clock, and resonance up to 9 o’clock to remove some of the remaining high frequencies.
Step 5: True Grit
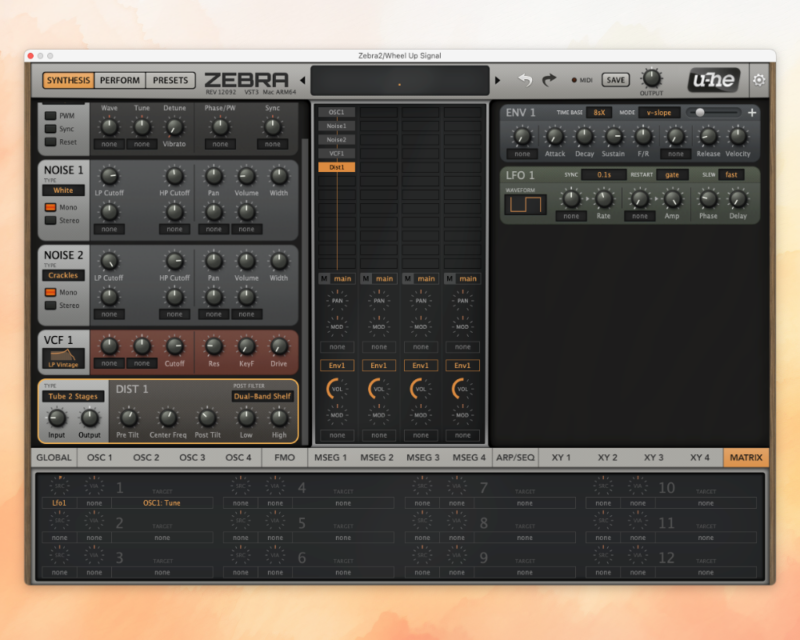
We can’t make this sample sound dusty enough. Layer after layer of saturation get us where we need to be. In the main grid, add Dist1 to a cell beneath the rest. Change the mode to Tube 2 Stages, then boost the input to about 9 o’clock, and adjust the Pre Tilt and Post Tilt as pictured.
Step 6: Aftereffects (not Adobe)
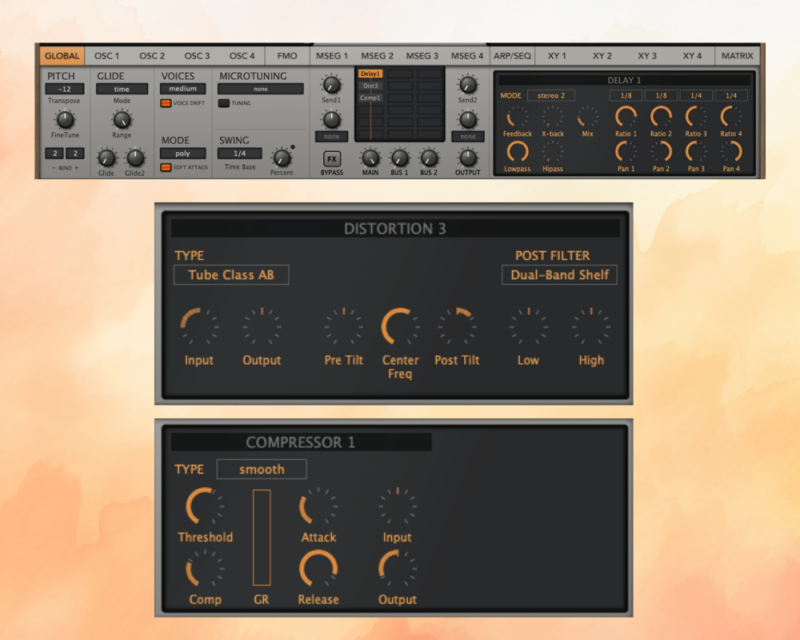
Now we click the GLOBAL tab on the bottom pane so we can see the FX grid. We’ll remove the existing mod FX module and replace it with Delay1, Dist3, and Comp1. A wide, dubby delay, some additional grit and a tilt EQ to reintroduce some grainy high frequencies, and a compressor at the end to give everything a nice tight hug give us what we’re after.
Adjust the parameters to match what’s pictured beneath.
Final Thoughts
Over the years, this sound has been pitched up, pitched down, filtered, and affected in every way conceivable—have some fun with it. Resample it, mangle it, and make it your own, and it will certainly add some authentic-sounding jungle flavor to your composition.
[social-links heading=”Follow Attack Magazine” facebook=”https://www.facebook.com/attackmag” twitter=”https://twitter.com/attackmag1″ instagram=”https://www.instagram.com/attackmag/” youtube=”https://www.youtube.com/user/attackmag” soundcloud=”https://soundcloud.com/attackmag” tiktok=”https://www.tiktok.com/@attackmagazine”]
[product-collection]
attackmagazine
In this Synth Secrets, we’ll recreate some of the jungle’s most iconic and oft-used samples from scratch using Zebra2.
Sure, you can use a sample. There are so many sample companies now you’re spoilt for choice. But if everyone else is, why not learn to do it from scratch? Then you can genuinely tweak it and make it your own. We’re going to get as close as possible to the exact sound of some classic dub sirens deployed across countless jungle, drum and bass, and garage tracks.
It’s a useful exercise in getting loads of vibe and color out of digital, virtual synthesizers. Ultimately, building the sample in a synth can open the sound up in huge ways.
Let’s start with one of our favorites, a sound popularized by DJ Gunshot’s 1996 track “Wheel Up.” Listen for its first appearance at the six-second mark and then again at nine seconds.
WhoSampled tells us that the sound has been sampled in 44 songs, but we all know that’s a massive underestimate! That sample has been featured in jungle, drum and bass, and garage tracks closer to 4,400 times over the years!
Here’s what we’re building:
And this is how it sounds in the context of a full composition:
We will use u-he’s powerful Zebra2 for all of our synthesis and effects. If you haven’t yet tried the Zebra family of synthesizers, download a demo here and thank us later. We’ll be using Ableton Live as our DAW but of course these concepts translate to your DAW of choice.
Set your DAW’s BPM to 174, punch this MIDI sequence in (yes… it’s just one note, and that’s C4 – yes it’s explosive), and let’s get going.
Step 1: Setting the Foundation
Start by initializing the patch. Now move to the bottom of the interface where the GLOBAL tab is highlighted and select the OSC1 tab. In the waveform selector which starts off with none selected, switch to the Tri-Saw-Pulse setting.
Then set Tune to 15.5 so when we hit middle C we get the pitch we want.
Progress so far = next to nil, but just wait…
Step 2: Sirens On
Now let’s get some rapid gratification. On the right side, head over to the LFO1 module and start by changing the waveform to sqr lo-hi. Then change Sync to 0.1s, set Restart to gate, Rate down to 88, and Phase to 25.
Then click on the Matrix tab to call up the mod matrix and route Lfo1 to osc1:tune Then turn the amount knob up to 8.
Now we can start to hear where we’re going.
Step 3: A Touch of Dirt
In the main grid we’re going to click on an empty cell beneath OSC1 and select Noise1 from the menu. Repeat once more to create another noise generator. The first one will give us some gritty tape hiss and the second a subtle crackle to make the sound feel like it was lifted from vinyl.
On the Noise 1 module’s controls, turn LP cutoff down to about 3 o’clock and turn HP cutoff to about 12 o’clock, shaving off the highs and lows to get a vintage midrange vibe. Turn the volume down to about 9 o’clock.
On Noise 2, change the mode from white to crackles. Turn HP cutoff up to 3 o’clock. This is one subtle change that will add up in the end.
Step 4: More Tone Shaping
Back on the main grid, add VCF 1 to a cell beneath the noise generators. Change the filter type from LP Excite to LP Vintage, turn the cutoff down to 3 o’clock, and resonance up to 9 o’clock to remove some of the remaining high frequencies.
Step 5: True Grit
We can’t make this sample sound dusty enough. Layer after layer of saturation get us where we need to be. In the main grid, add Dist1 to a cell beneath the rest. Change the mode to Tube 2 Stages, then boost the input to about 9 o’clock, and adjust the Pre Tilt and Post Tilt as pictured.
Step 6: Aftereffects (not Adobe)
Now we click the GLOBAL tab on the bottom pane so we can see the FX grid. We’ll remove the existing mod FX module and replace it with Delay1, Dist3, and Comp1. A wide, dubby delay, some additional grit and a tilt EQ to reintroduce some grainy high frequencies, and a compressor at the end to give everything a nice tight hug give us what we’re after.
Adjust the parameters to match what’s pictured beneath.
Final Thoughts
Over the years, this sound has been pitched up, pitched down, filtered, and affected in every way conceivable—have some fun with it. Resample it, mangle it, and make it your own, and it will certainly add some authentic-sounding jungle flavor to your composition.
[social-links heading=”Follow Attack Magazine” facebook=”https://www.facebook.com/attackmag” twitter=”https://twitter.com/attackmag1″ instagram=”https://www.instagram.com/attackmag/” youtube=”https://www.youtube.com/user/attackmag” soundcloud=”https://soundcloud.com/attackmag” tiktok=”https://www.tiktok.com/@attackmagazine”]
[product-collection]