CD, CD Çalar, DVD, DVD Çalar, SACD, LP, Plak Çeşitleri ve Fiyatları
In this article, we show you some beginner modulation techniques to liven up your synth parts using the modulation matrix in Wavetable within Ableton Live.
Modulation is a key synthesis element. Good modulation programming can transform a boring and stale sound into one that is exciting and vibrant. It’s also not hard to do once you know your way around a modulation matrix. In a recent tutorial, 10 Common Modulation Routings Using Ableton Wavetable, we introduced some basic modulation techniques and showed how to set them up in Wavetable. Today, we’ll be applying those core techniques to various elements in a track.
We’ll use modulation routing to go from this:
To this:
If you’re a newbie and are unfamiliar with exactly what LFOs and envelopes are, or how to get around Wavetable’s mod matrix, refresh yourself with the original tutorial before proceeding.
As always, click on any image to see a larger version.
And last, these techniques can be applied in any good synth – this is not just for the Live heads!
[advert]
Bass Modulation
We’re making a 115 bpm track with a groovy vibe. The bassline will be the main focus of the song. As such, we want it to not only hold down the low end but also grab the listener’s attention. Let’s use modulation to achieve that.
Here’s the bassline with no modulation yet:
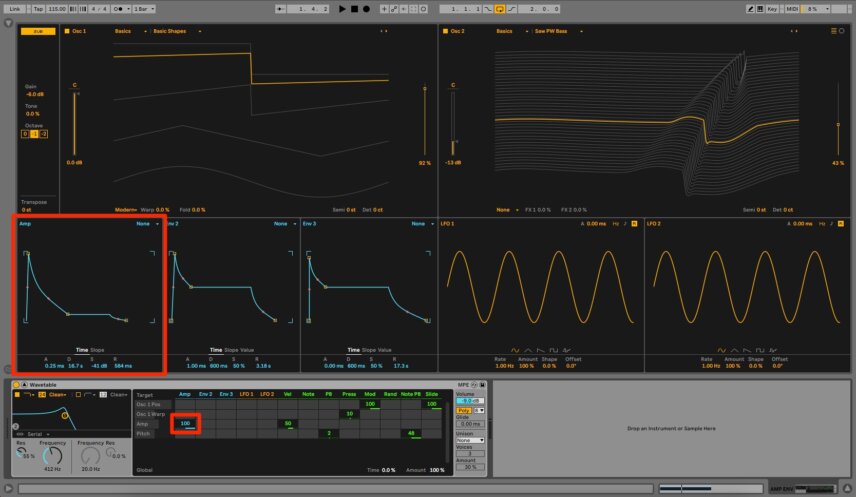
The bass sound itself is fairly shapeless. By modulating Wavetable’s amp with an envelope, we can shape it into something with more definition by changing the volume of the sound over time.
Connect Envelope 1 to Amp in the mod matrix by dragging in the box. Bring it up to 100. Next, shape the envelope into something suitable for a bass sound. A very short attack, medium decay, low sustain and tasteful amount of release give us a workable bass pluck.
Bass with envelope modifying amplitude:
[advert]
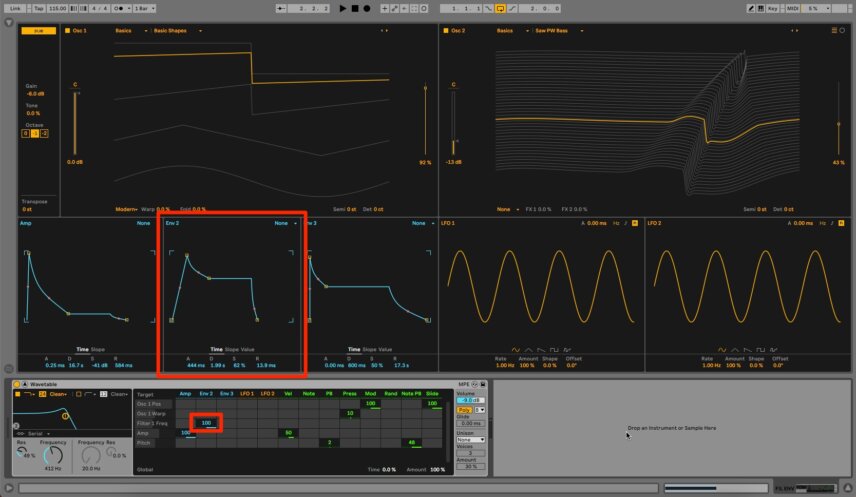
Next, let’s use an envelope to shape the contour of the cutoff frequency on the lowpass filter. We’re after a dread bass-style effect, with a slow opening of the cutoff. Click on the Frequency dial on the filter to make it appear as a destination in the mod matrix. Then, assign Envelope 2 to it with an amount of 100. Now it’s all about shaping the envelope for an effective result. Try a medium attack, short decay, medium sustain and very short release.
The bass now with an envelope controlling filter cutoff:
[advert]
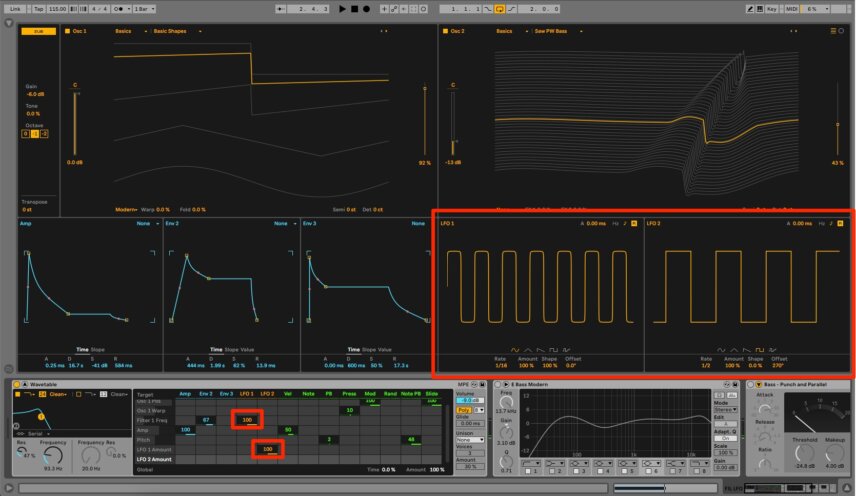
For the final touch, we want to add some motion to the filter cutoff. We’ve got some long bass notes that are just crying out for some wubs. Start with a tried and true modulation pairing of a sine wave LFO running in sixteenths modifying the filter cutoff. You can also adjust the shape of the LFO curve for a more pronounced effect.
LFO to filter cutoff:
The problem is, we lose the weight of the bass with the LFO running throughout the entire note. Let’s try adding another LFO to the equation. This time, connect LFO 2 to the amount of LFO 1. By using a square wave, we can effectively open and close LFO 1 periodically. Use a slow rate (half notes) and adjust the Offset (phase) to control the rhythm of the opening and closing.
LFO 2 modulating LFO 1:
[advert]
Moving Chords
Next, let’s use modulation to inject some life into a very static synth sound.
The lifeless synth:
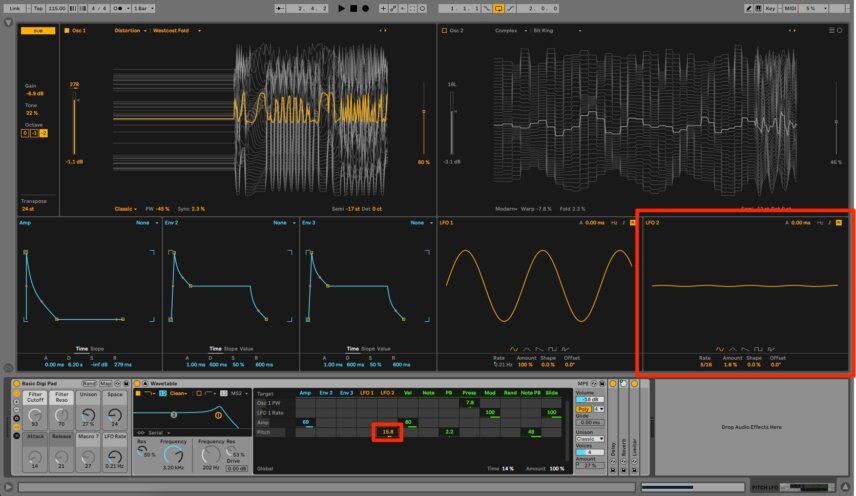
First, let’s use an LFO to modulate the pitch. Add some of LFO 2 to the Pitch destination on the mod matrix. Just a little dab will do you. Notice in the image that we’ve got a tiny amount on the LFO itself (1.6% ) plus only 15.8 going to the target destination.
Top Tip: Play around with the LFO rate for more laid-back or hyped-up variations. You can also try letting the LFO run freely for a seasick effect.
The chords with pitch modulation:
[advert]
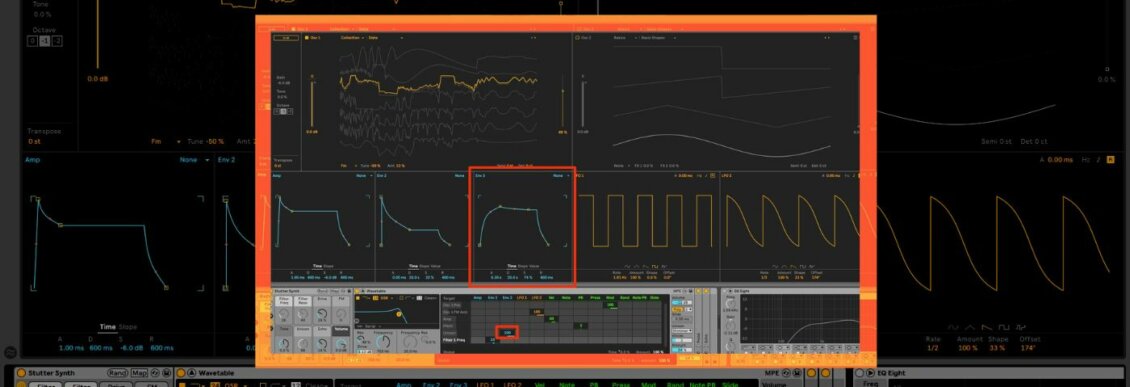
We’re using a wavetable synth so let’s get the wavetable position involved. In the original tutorial, we talked about using an LFO to modify the position. That’s great for a continuous effect but let’s use an envelope this time for a finite change. Connect Envelope 2 to the position of oscillator 1, dial in an amount, and then adjust the envelope appropriately.
Envelope 2 modulating wavetable position:
[advert]
Finally, let’s introduce a rhythmic, tonal effect. Head to LFO 1 and change the shape to random. Next, connect LFO 1 to Oscillator 1’s pulse width (PW) to affect how the wave pushes and pulls. Now the pulse width of the wavetable changes in time to the random LFO.
The finished synth chords:

[advert]
Transforming Downer Effect
For the final sound, let’s use modulation to make a downer out of a static synth sound.
Here’s the sound we’re starting with:
Begin with the filter. Connect Envelope 2 to the filter frequency and give it a basic slope. We’re starting rather bright but we’ll be darkening it up soon.
With filter envelope modulation:
[advert]
Next, let’s roughen things up even more with FM, or frequency modulation. In the mod matrix, make a connection between LFO 2 and oscillator 1 FM Amount. Remember that if you don’t see the destination you want in the matrix, click on the parameter in the synth itself and it will appear. By using a slow rate and modified sawtooth LFO, you can add pulsing distortion.
Modulating FM with LFO 2:
[advert]
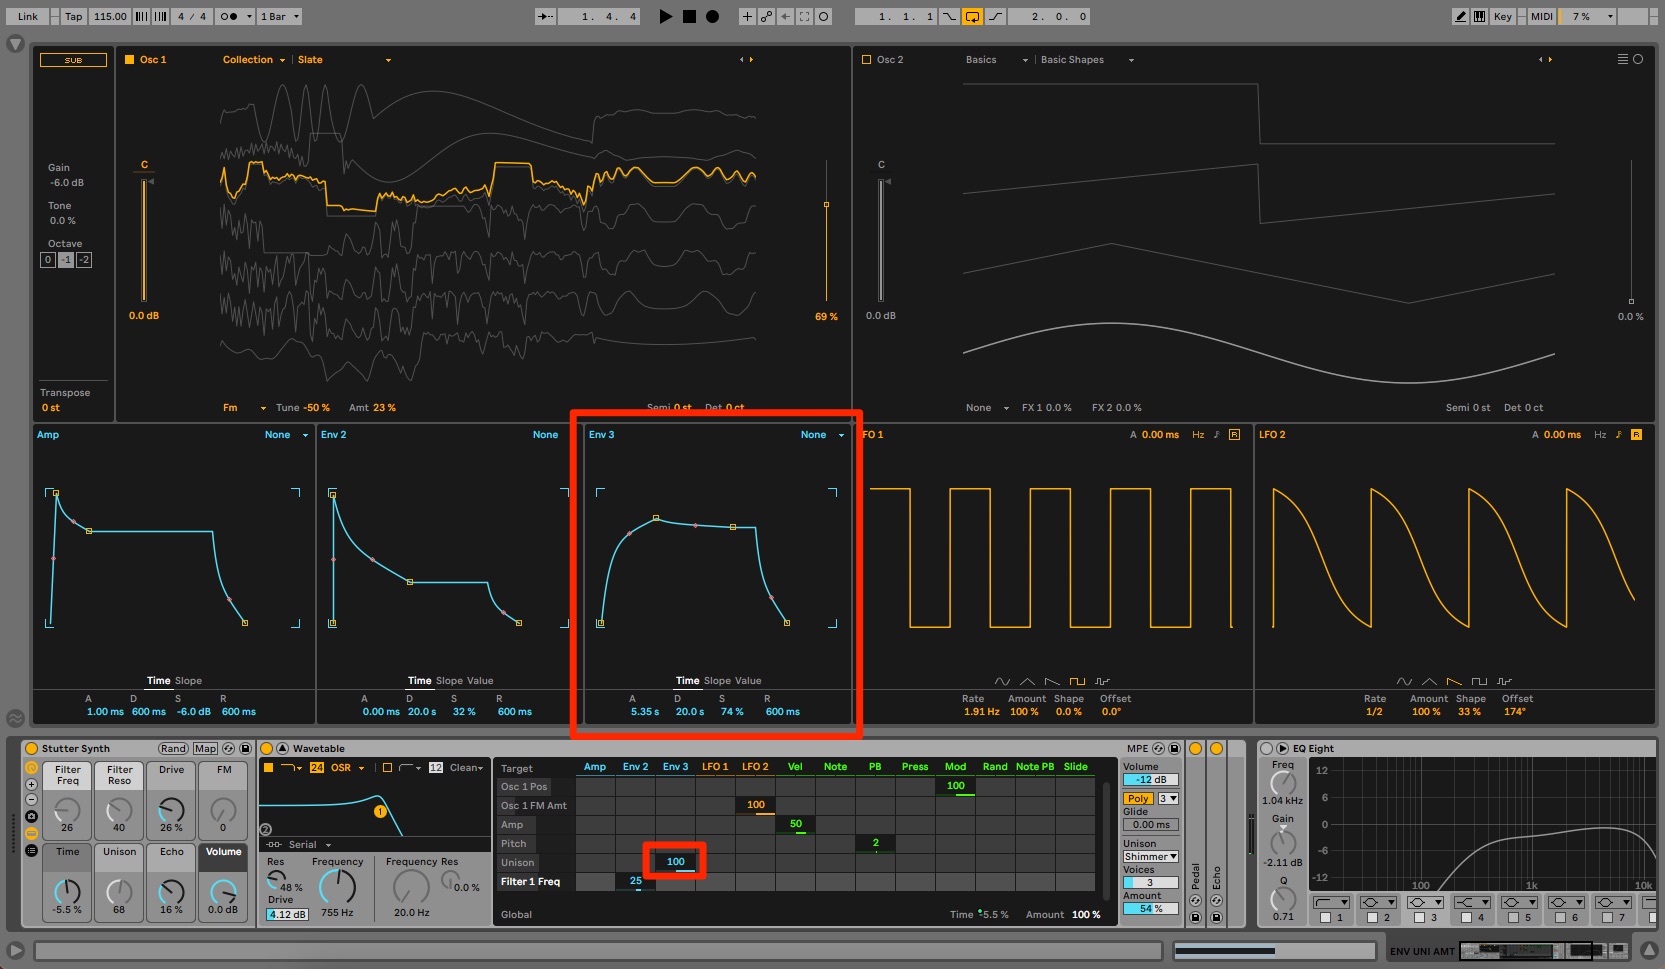
For the final touch, let’s alter the amount of unison (stacked voices) over time with an envelope. Connect Envelope 3 to Unison and program a shape that works with the sound. This may require some trail and error but you’ll hear it when you’re successful. You can also try adjusting the slope of the envelope lines.
The finished downer:
Here’s the finished track with additional production in Live. It’s also got a beat from Splice, ‘TS_VIRGO_115_drum_loop_grooves_chill_on_the_floor.wav’ from the pack Virgo by Jamie Lidell.
The track:
[product-collection]
Follow Attack Magazine
[social-links facebook=”https://www.facebook.com/attackmag” twitter=”https://twitter.com/attackmag1″ instagram=”https://www.instagram.com/attackmag/” youtube=”https://www.youtube.com/user/attackmag” soundcloud=”https://soundcloud.com/attackmag” tiktok=”https://www.tiktok.com/@attackmagazine”]
attackmagazine
In this article, we show you some beginner modulation techniques to liven up your synth parts using the modulation matrix in Wavetable within Ableton Live.
Modulation is a key synthesis element. Good modulation programming can transform a boring and stale sound into one that is exciting and vibrant. It’s also not hard to do once you know your way around a modulation matrix. In a recent tutorial, 10 Common Modulation Routings Using Ableton Wavetable, we introduced some basic modulation techniques and showed how to set them up in Wavetable. Today, we’ll be applying those core techniques to various elements in a track.
We’ll use modulation routing to go from this:
To this:
If you’re a newbie and are unfamiliar with exactly what LFOs and envelopes are, or how to get around Wavetable’s mod matrix, refresh yourself with the original tutorial before proceeding.
As always, click on any image to see a larger version.
And last, these techniques can be applied in any good synth – this is not just for the Live heads!
[advert]
Bass Modulation
We’re making a 115 bpm track with a groovy vibe. The bassline will be the main focus of the song. As such, we want it to not only hold down the low end but also grab the listener’s attention. Let’s use modulation to achieve that.
Here’s the bassline with no modulation yet:
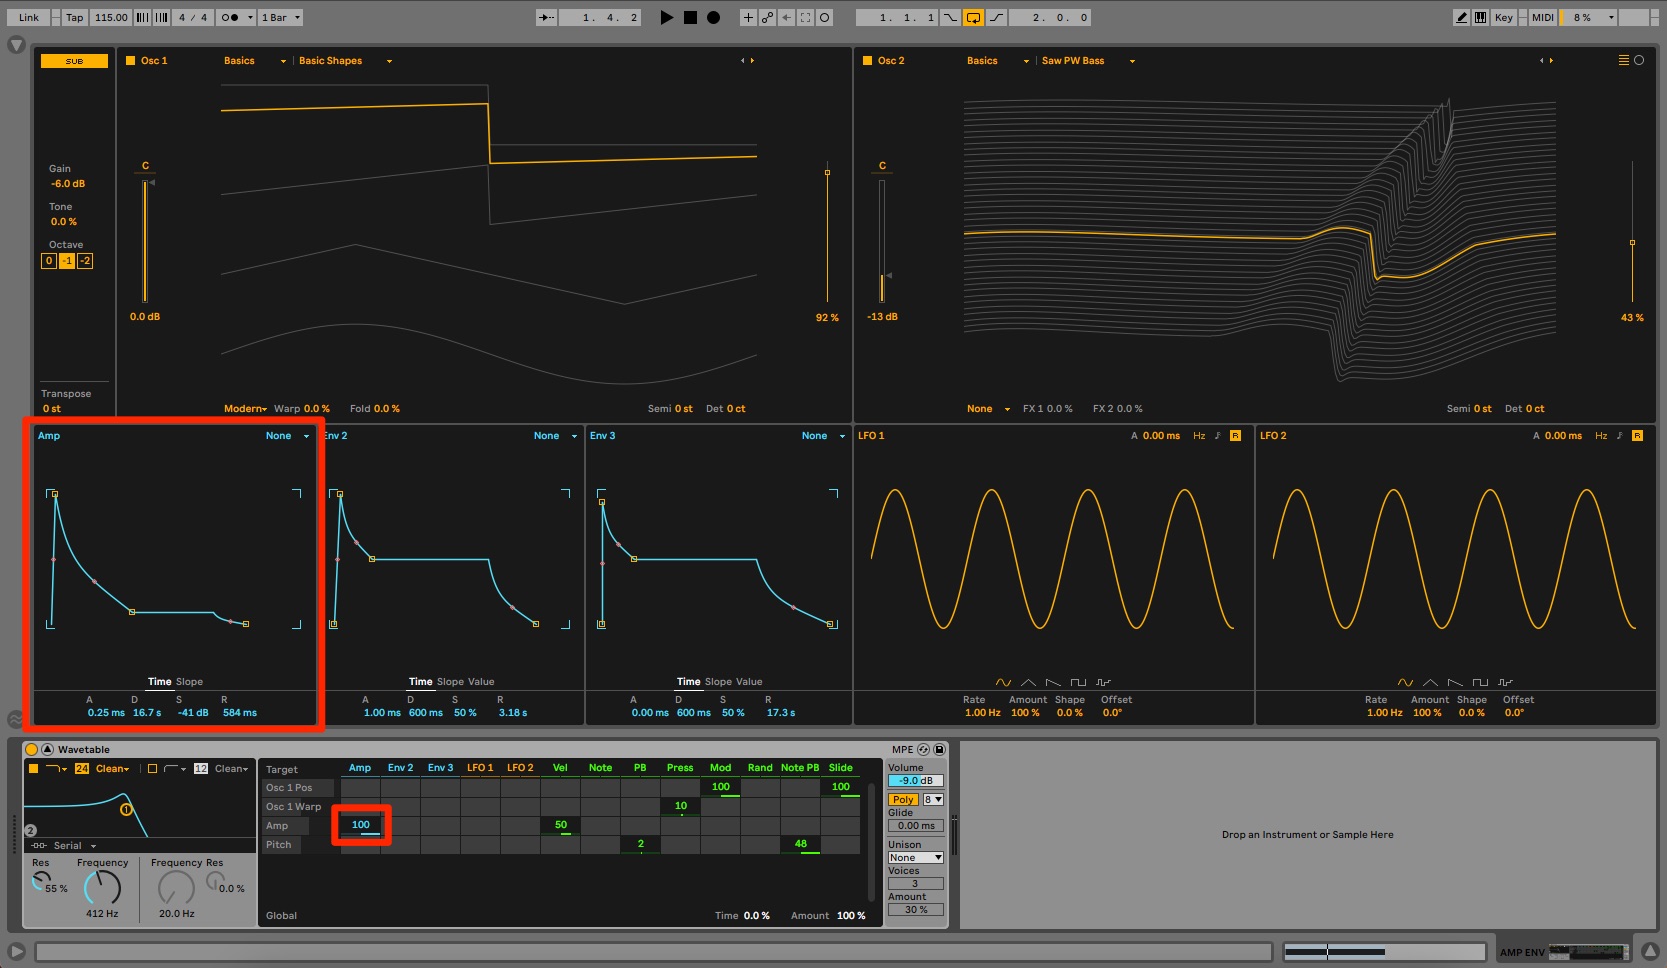
The bass sound itself is fairly shapeless. By modulating Wavetable’s amp with an envelope, we can shape it into something with more definition by changing the volume of the sound over time.
Connect Envelope 1 to Amp in the mod matrix by dragging in the box. Bring it up to 100. Next, shape the envelope into something suitable for a bass sound. A very short attack, medium decay, low sustain and tasteful amount of release give us a workable bass pluck.
Bass with envelope modifying amplitude:
[advert]
Next, let’s use an envelope to shape the contour of the cutoff frequency on the lowpass filter. We’re after a dread bass-style effect, with a slow opening of the cutoff. Click on the Frequency dial on the filter to make it appear as a destination in the mod matrix. Then, assign Envelope 2 to it with an amount of 100. Now it’s all about shaping the envelope for an effective result. Try a medium attack, short decay, medium sustain and very short release.
The bass now with an envelope controlling filter cutoff:

[advert]
For the final touch, we want to add some motion to the filter cutoff. We’ve got some long bass notes that are just crying out for some wubs. Start with a tried and true modulation pairing of a sine wave LFO running in sixteenths modifying the filter cutoff. You can also adjust the shape of the LFO curve for a more pronounced effect.
LFO to filter cutoff:
The problem is, we lose the weight of the bass with the LFO running throughout the entire note. Let’s try adding another LFO to the equation. This time, connect LFO 2 to the amount of LFO 1. By using a square wave, we can effectively open and close LFO 1 periodically. Use a slow rate (half notes) and adjust the Offset (phase) to control the rhythm of the opening and closing.
LFO 2 modulating LFO 1:

[advert]
Moving Chords
Next, let’s use modulation to inject some life into a very static synth sound.
The lifeless synth:
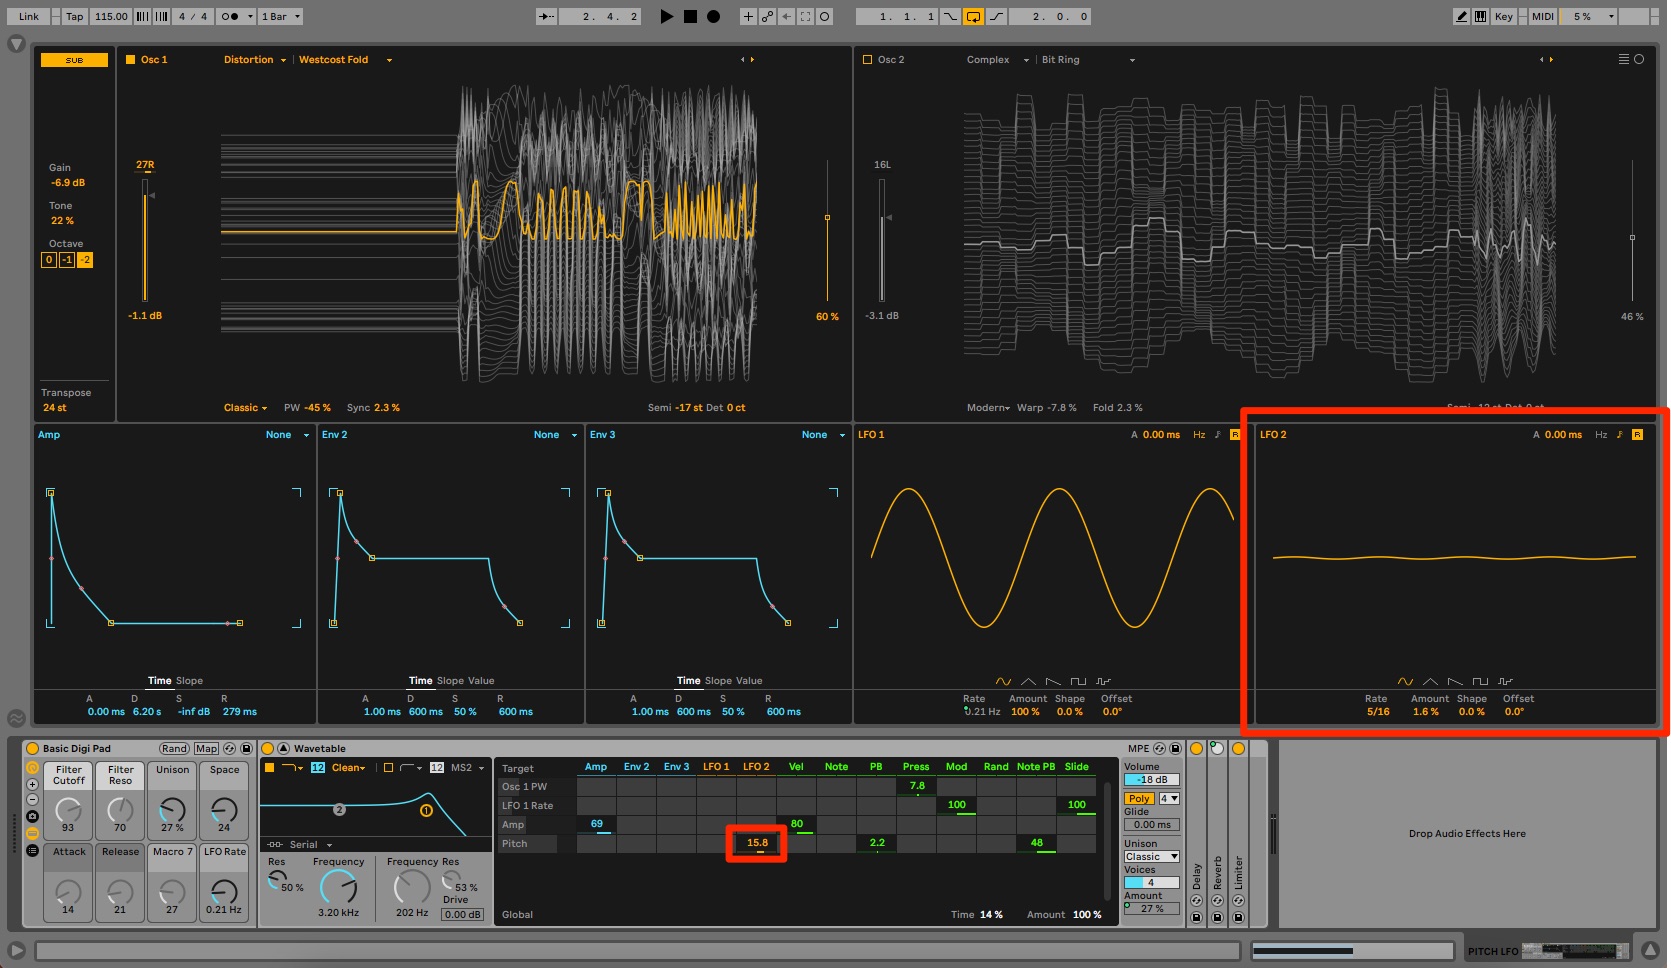
First, let’s use an LFO to modulate the pitch. Add some of LFO 2 to the Pitch destination on the mod matrix. Just a little dab will do you. Notice in the image that we’ve got a tiny amount on the LFO itself (1.6% ) plus only 15.8 going to the target destination.
Top Tip: Play around with the LFO rate for more laid-back or hyped-up variations. You can also try letting the LFO run freely for a seasick effect.
The chords with pitch modulation:
[advert]
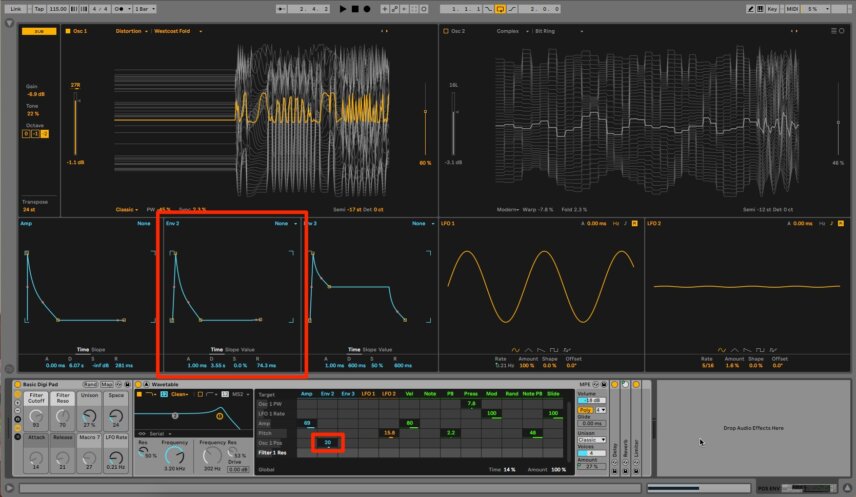
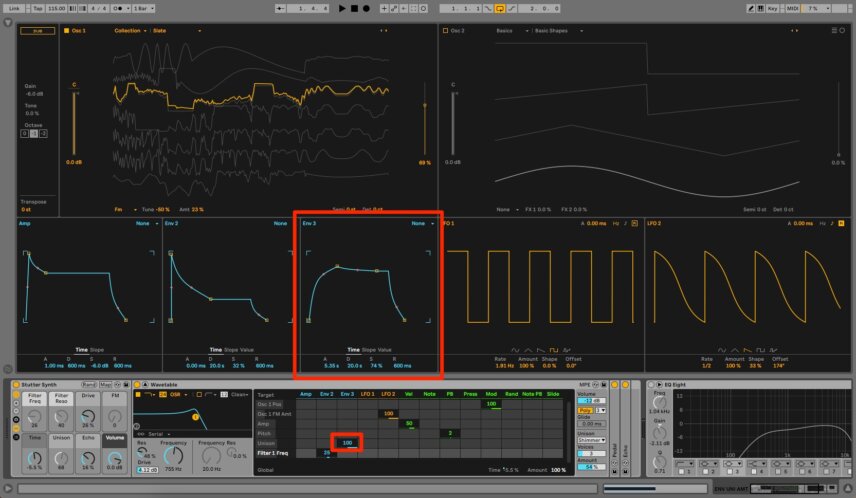
We’re using a wavetable synth so let’s get the wavetable position involved. In the original tutorial, we talked about using an LFO to modify the position. That’s great for a continuous effect but let’s use an envelope this time for a finite change. Connect Envelope 2 to the position of oscillator 1, dial in an amount, and then adjust the envelope appropriately.
Envelope 2 modulating wavetable position:

[advert]
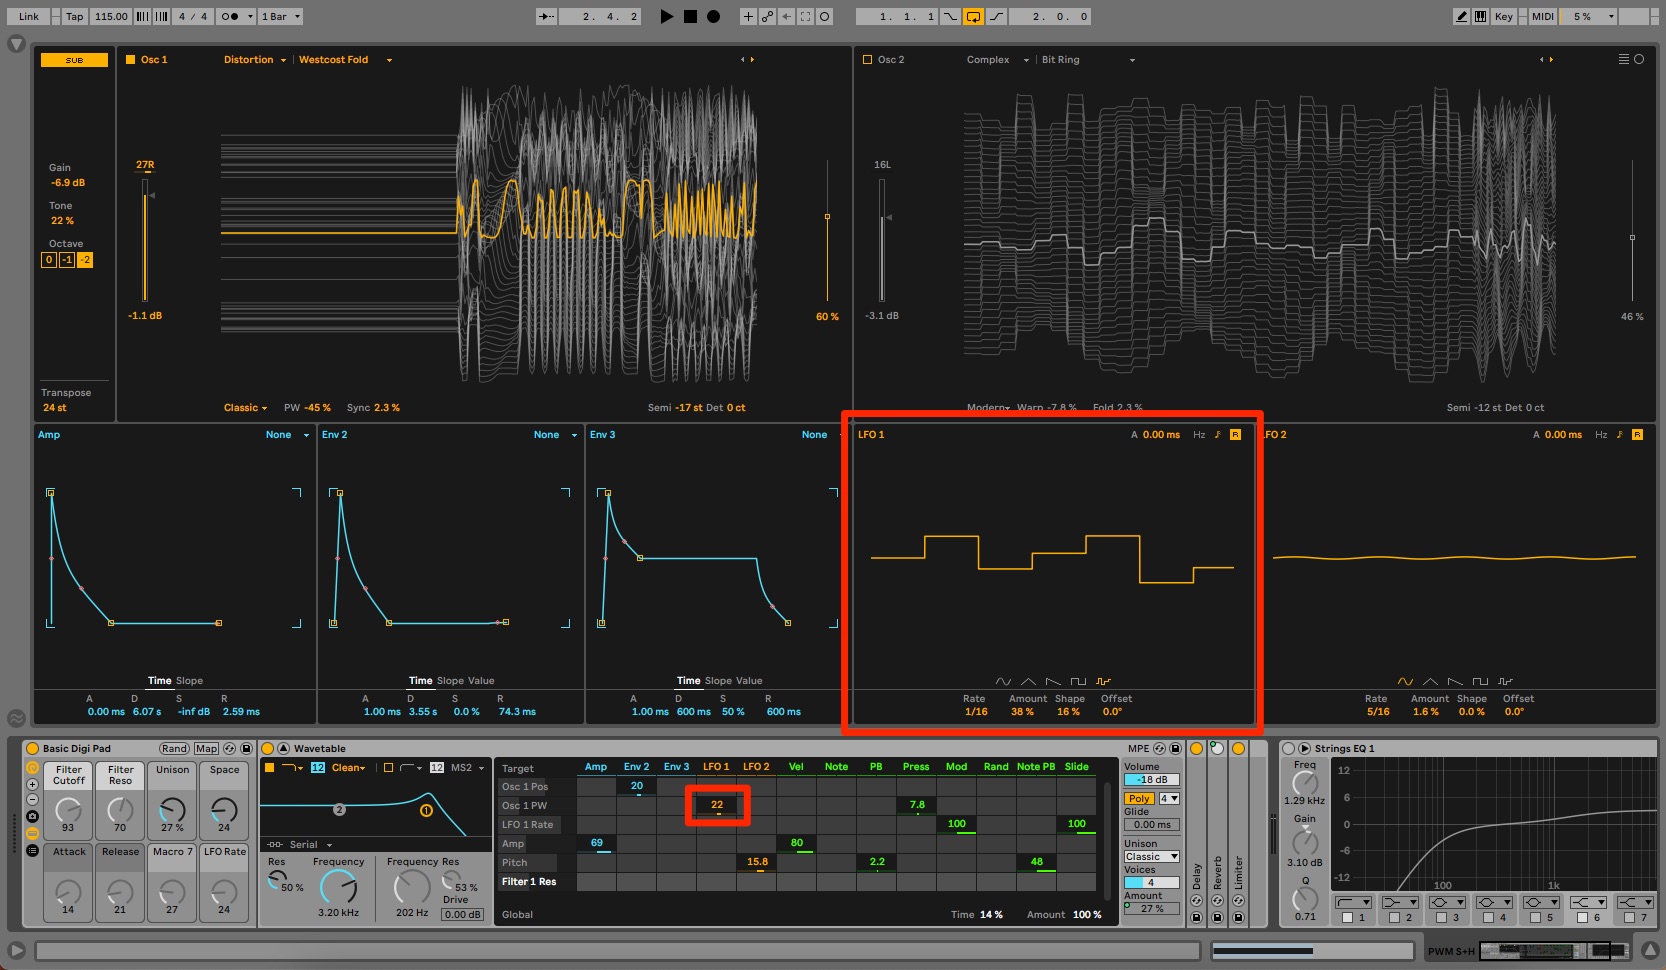
Finally, let’s introduce a rhythmic, tonal effect. Head to LFO 1 and change the shape to random. Next, connect LFO 1 to Oscillator 1’s pulse width (PW) to affect how the wave pushes and pulls. Now the pulse width of the wavetable changes in time to the random LFO.
The finished synth chords:
[advert]
Transforming Downer Effect
For the final sound, let’s use modulation to make a downer out of a static synth sound.
Here’s the sound we’re starting with:
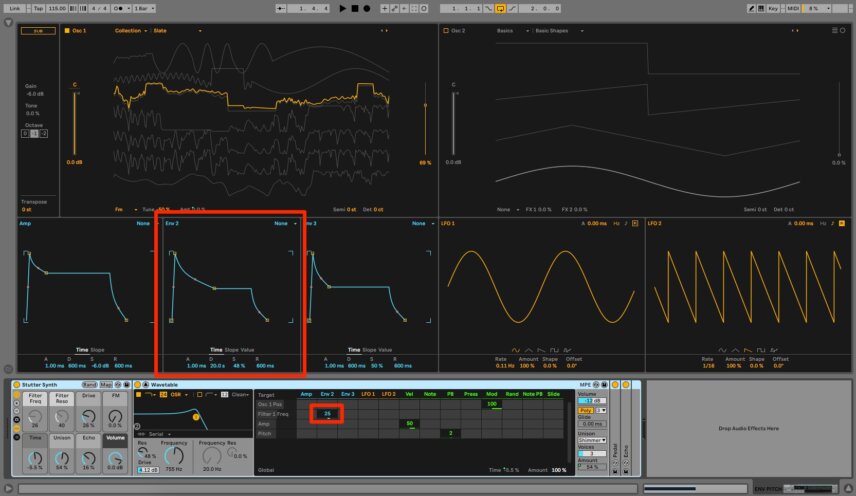
Begin with the filter. Connect Envelope 2 to the filter frequency and give it a basic slope. We’re starting rather bright but we’ll be darkening it up soon.
With filter envelope modulation:

[advert]
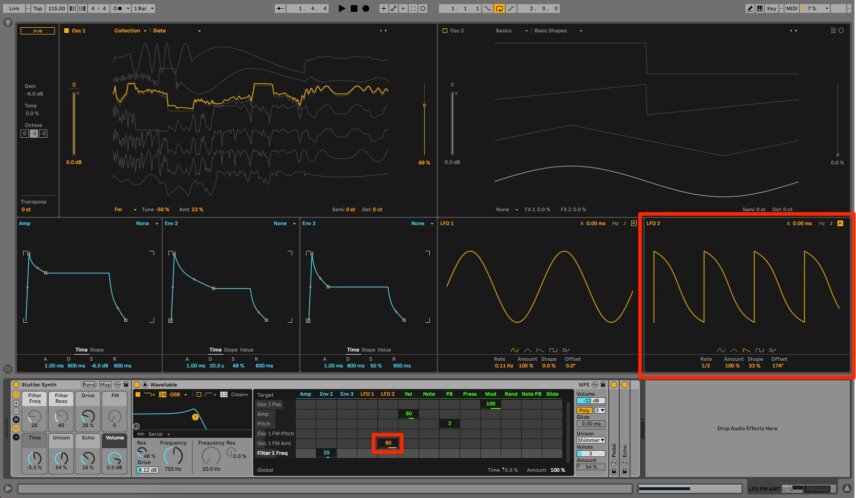
Next, let’s roughen things up even more with FM, or frequency modulation. In the mod matrix, make a connection between LFO 2 and oscillator 1 FM Amount. Remember that if you don’t see the destination you want in the matrix, click on the parameter in the synth itself and it will appear. By using a slow rate and modified sawtooth LFO, you can add pulsing distortion.
Modulating FM with LFO 2:

[advert]
For the final touch, let’s alter the amount of unison (stacked voices) over time with an envelope. Connect Envelope 3 to Unison and program a shape that works with the sound. This may require some trail and error but you’ll hear it when you’re successful. You can also try adjusting the slope of the envelope lines.
The finished downer:
Here’s the finished track with additional production in Live. It’s also got a beat from Splice, ‘TS_VIRGO_115_drum_loop_grooves_chill_on_the_floor.wav’ from the pack Virgo by Jamie Lidell.
The track:
[product-collection]
Follow Attack Magazine
[social-links facebook=”https://www.facebook.com/attackmag” twitter=”https://twitter.com/attackmag1″ instagram=”https://www.instagram.com/attackmag/” youtube=”https://www.youtube.com/user/attackmag” soundcloud=”https://soundcloud.com/attackmag” tiktok=”https://www.tiktok.com/@attackmagazine”]