CD, CD Çalar, DVD, DVD Çalar, SACD, LP, Plak Çeşitleri ve Fiyatları

Load up FabFilter’s powerful Twin 3 and take a classic sound in new directions.
Where most attribute the ever-popular Reese bassline to early jungle pioneer Alex Reece on his seminal track “Pulp Fiction,” Kevin Saunderson is, in fact, the original creator of the sound. Achieved on a Casio CZ-5000 and under the moniker Reese, he sculpted and experimented to create the classic sound “Just Want Another Chance” in 1988.
The Reese bassline is two sawtooth waveforms, detuned and filtered. It can be kept simple and raw or complex and technical. Over the decades, it has evolved, with artists constantly pushing it to new frontiers. But even in its simple, purest form, it still can shake a dancefloor and rattle its patrons.
The synth sound is a classic staple for multiple genres, such as drum and bass, garage, and house. It is multifunctional, too, creating anthemic bangers or dark growlers, depending on your end goal.
This tutorial pays homage to the sounds of Brit Award winners Chase & Status and Grammy award-winning Fred Again with a gritty variation on their use of the powerful Reese bassline. We will use the excellent Twin 3 by FabFilter, but you could apply these principles to a softsynth of your choice.
Here is how the end result sounds:
Step 1: MIDI
Begin by setting the tempo to 135 BPM, load Twin 3, and choose the preset named “Clean”
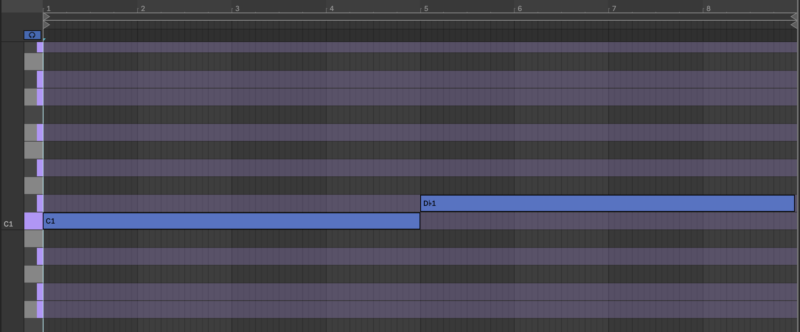
Draw in a MIDI clip and compose a bassline. It does not need to be complex. A simple two-note monophonic bassline will suffice.
Step 2: Setting up the synth
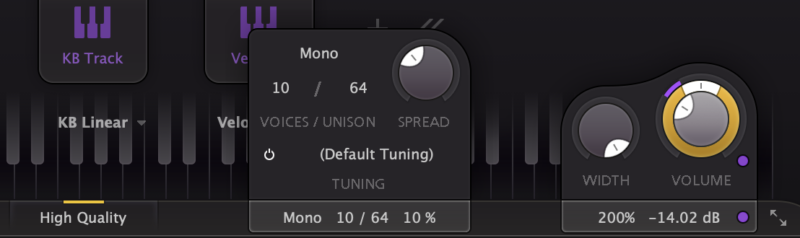
Change Twin 3 from Poly to Mono and the Unison Voices to 64. Bring up the spread to 10%. This will add extra width to the sound.
Turn on High Quality mode. This will enable oversampling and reduce aliasing artifacts, giving a cleaner sound. Set the Width to 200% and bring down the Output Volume to -14 dB. This will be a heavily distorted bass, so gain-staging from the very beginning is essential
Step 3: Set up the oscillators
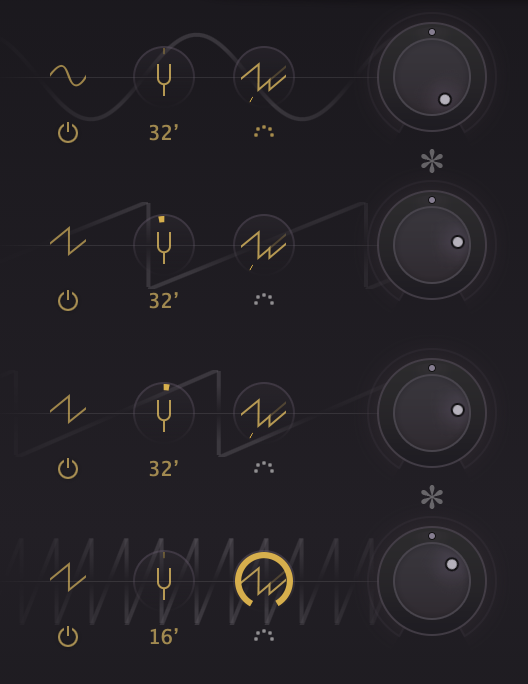
Four oscillators are required to shape the sound. Start with Osc 1. Change to a sinewave waveform, decrease to -1 octave, and increase to 0.00dB. This oscillator will serve as the sub bass.
Click the + button to add Osc 2. Change to a sawtooth waveform. Turn the detune knob slightly to the left so it is at approximately -0.070 semitones. Decrease the volume to -8.00 dB.
Click the + button to add Osc 3. It should remain as a sawtooth waveform. Turn the detune knob slightly to the right this time and set it to 0.070 semitones. Decrease the volume to -8.00 dB. Oscillators 2 and 3 now serve as the main body of the release sound.
Click the + button once more to add Osc4. Increase to 0 octaves. Increase Osc 4 sync to 4.00 and decrease the volume to -12 dB. This will add an interesting metallic texture to the sound.
Step 4: Filtering the sound
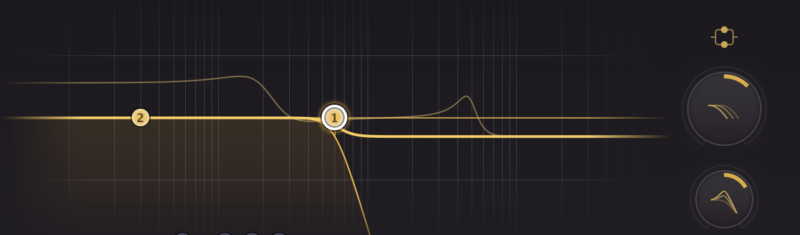
Begin by reducing the low-pass filter to 600 Hz. Hover over the filter 1 circle and then the three dots to bring up the filter options. Change the filter type to Metal. This will add extra grit and distortion to the filter.
Double-click on the display to add a second filter. Change this to Low Shelf and the filter type to Clean. Set the frequency to 30 Hz. As the low end is being boosted, keeping it as clean as possible is desired.
Increase the Filter Freq Offset to 3 octaves and the Filter Peak Offset to 40%. This will be modulated in the next step.
Finally, set the Filter Routing to Parallel. This is so each oscillator is fed through both filters independently and then mixed together.
Step 5: Modulating the filter
Press the Add Modulation button and choose New XLFO. Select 1/16 sync rate.

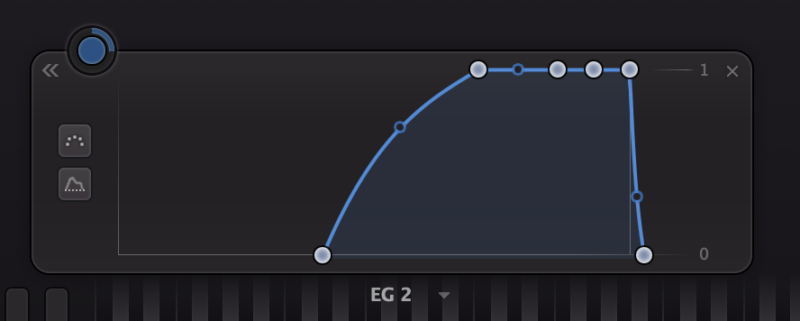
Then press the Add Modulation button again and choose New Envelope Generator. Increase the delay to 1714 milliseconds. This is calculated by taking the 60 (representative of seconds in a minute) and dividing by 140 (representative of the beats per minute). This will give the number 0.428 (representative of 1 beat) Times this by 4 (due to four beats per bar) for a delay time of 1.714 seconds.
Or use this site to work it out quickly! https://toolstud.io/music/bpm.php
Then change the attack to 3428 milliseconds (So the change occurs over two bars). Increase the sustain to 0 dB and the release time to 1 millisecond.
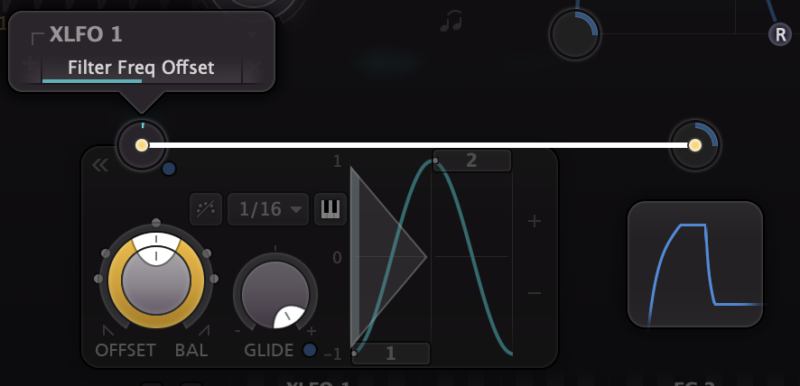
Route EG 2 to XLFO 1’s Level. Set the Level to 0 and bring up Slot Level to 1.000.
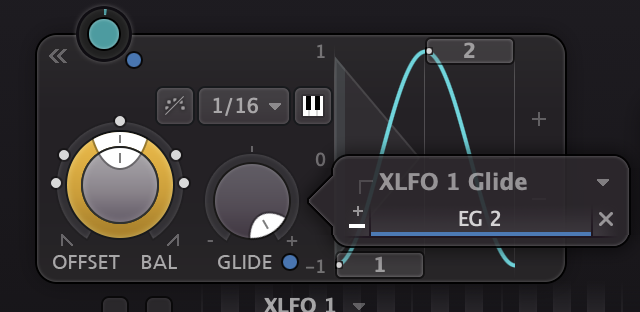
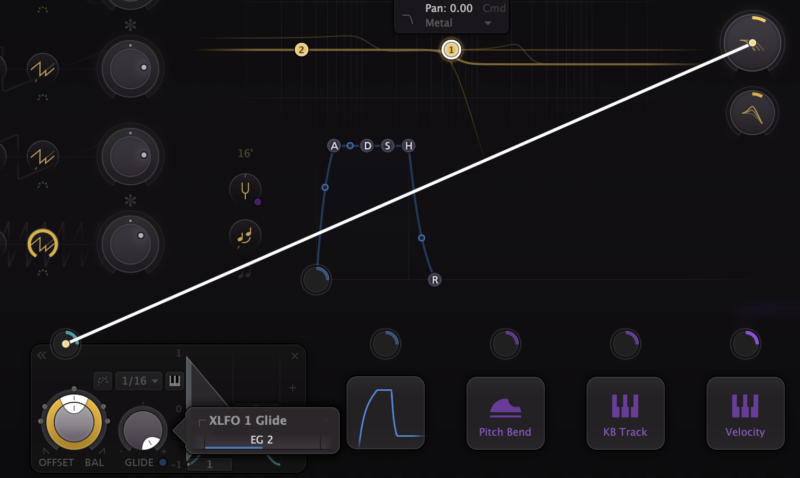
Then Route EG 2 to XLFO 1’s Glide. Set the Slot Level to 1.000 but use the minus button to invert the signal.
Finally, route the XLFO 1 Level to the Filter Freq Offset.
Step 6: Adding Chorus & Distortion
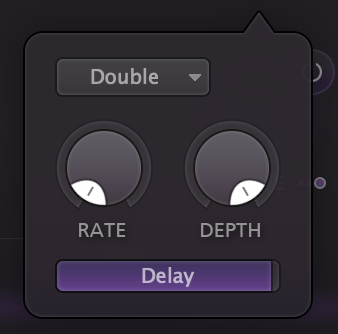
Turn on Chorus and change the amount to 60%. Change the mode to double. Slow the rate down to 0.005 Hz, set the depth to 100%, and increase the delay to 30.00 ms.
At this point, the volume on the channel will start to rise to over 0 dB, so decrease the Output Volume to -18 dB.
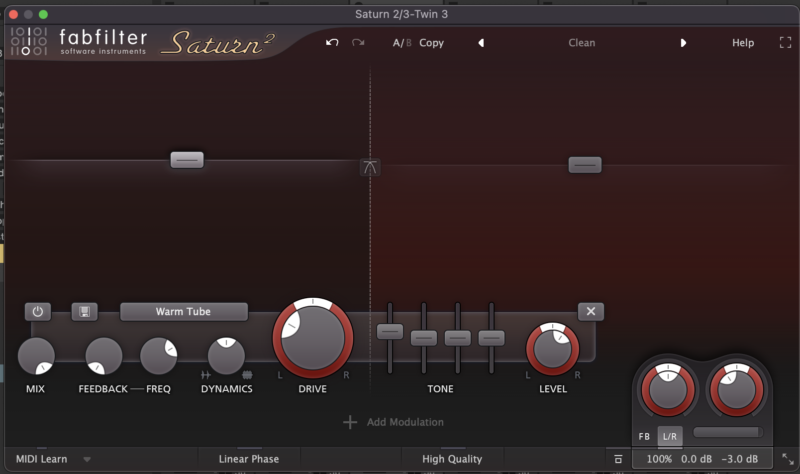
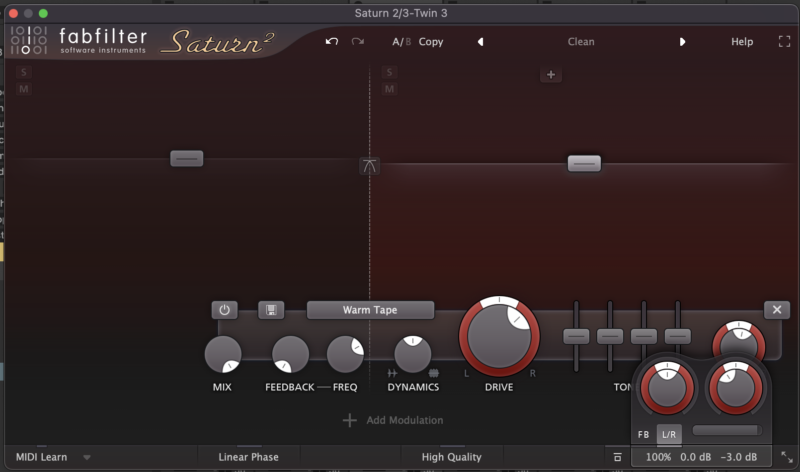
Load Saturn 2 onto the channel. Add a band split at 400hz.
On Band 1, select Warm Tube. Add 30% Drive, boost to 1 dB on the Bass slider, and increase the level to 3 dB. For Band 2, select Warm Tape. Add 65% drive and increase the level to 1 dB. Finally, decrease the Output to -3.0 dB.
Step 8. Applying Mid-Side EQ
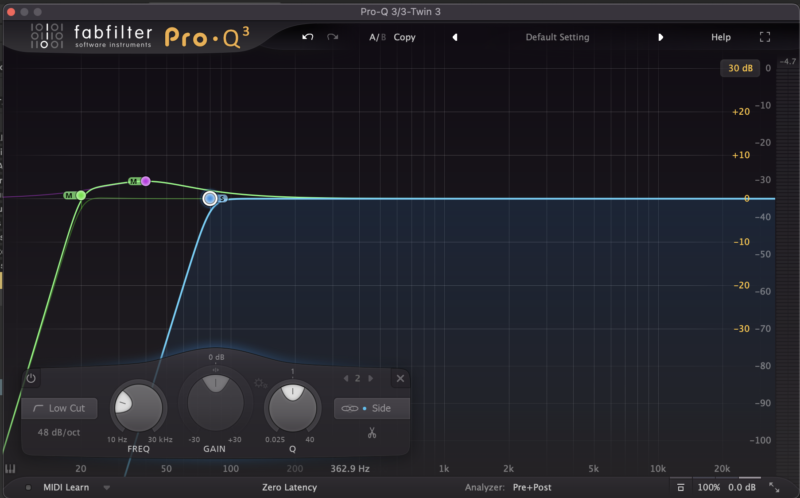
Load Pro-Q 3 or an EQ with Mid-Side processing options. Add a 48 dB sloped lo-cut filter and place it at 20 Hz. Change the stereo placement to Mid.
Add a bell filter. Boost by 4 dB and place at 40 Hz. Again, change the stereo placement to Mid.
Finally, add another 48 dB sloped lo-cut filter, but place it at 80 Hz. Change the stereo placement to the Side. This will clear the low-end frequencies from the stereo field and boost them gently in the mono field.
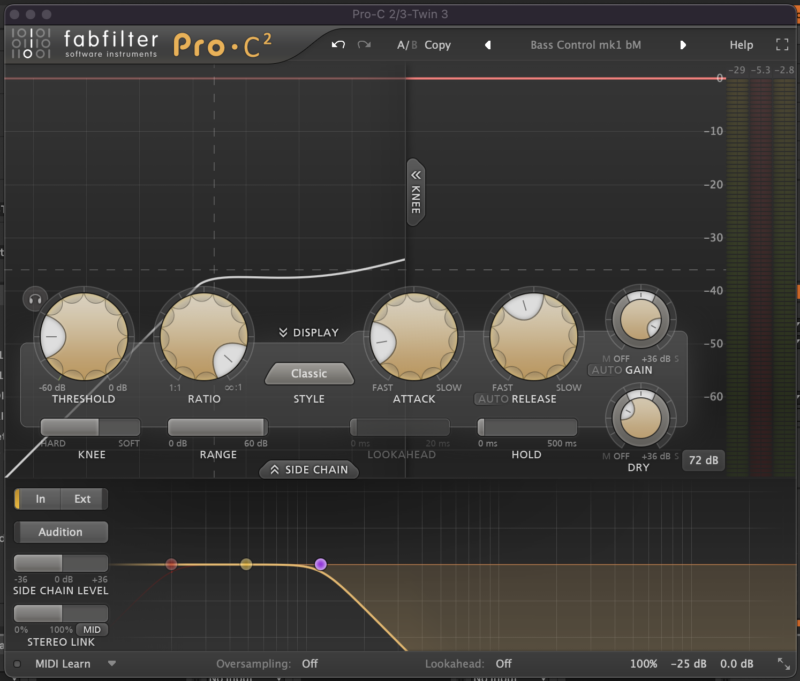
Step 9: Compress the Bass
Add Pro-C 2 or a compressor of your choice. Select the preset Bass Control mk1 bM from the Mastering presets. Increase the Wet Gain to 25 dB.
Step 10: Add music for context
Add your favorite drums, vocals, and synth lines to bring them to life.
If you prefer the classic Reese bass sound, turn off Osc 4, change the filter routing to Serial, bypass the modulation, and lower the frequency of the cutoff to 200 Hz.
If you like the Twin 3, you can enjoy a variety of Twin 3 tutorials on Attack and YouTube.
[social-links heading=”Follow Attack Magazine” facebook=”https://www.facebook.com/attackmag” twitter=”https://twitter.com/attackmag1″ instagram=”https://www.instagram.com/attackmag/” youtube=”https://www.youtube.com/user/attackmag” soundcloud=”https://soundcloud.com/attackmag” tiktok=”https://www.tiktok.com/@attackmagazine”]
attackmagazine
Load up FabFilter’s powerful Twin 3 and take a classic sound in new directions.
Where most attribute the ever-popular Reese bassline to early jungle pioneer Alex Reece on his seminal track “Pulp Fiction,” Kevin Saunderson is, in fact, the original creator of the sound. Achieved on a Casio CZ-5000 and under the moniker Reese, he sculpted and experimented to create the classic sound “Just Want Another Chance” in 1988.
The Reese bassline is two sawtooth waveforms, detuned and filtered. It can be kept simple and raw or complex and technical. Over the decades, it has evolved, with artists constantly pushing it to new frontiers. But even in its simple, purest form, it still can shake a dancefloor and rattle its patrons.
The synth sound is a classic staple for multiple genres, such as drum and bass, garage, and house. It is multifunctional, too, creating anthemic bangers or dark growlers, depending on your end goal.
This tutorial pays homage to the sounds of Brit Award winners Chase & Status and Grammy award-winning Fred Again with a gritty variation on their use of the powerful Reese bassline. We will use the excellent Twin 3 by FabFilter, but you could apply these principles to a softsynth of your choice.
Here is how the end result sounds:
Step 1: MIDI
Begin by setting the tempo to 135 BPM, load Twin 3, and choose the preset named “Clean”
Draw in a MIDI clip and compose a bassline. It does not need to be complex. A simple two-note monophonic bassline will suffice.
Step 2: Setting up the synth
Change Twin 3 from Poly to Mono and the Unison Voices to 64. Bring up the spread to 10%. This will add extra width to the sound.
Turn on High Quality mode. This will enable oversampling and reduce aliasing artifacts, giving a cleaner sound. Set the Width to 200% and bring down the Output Volume to -14 dB. This will be a heavily distorted bass, so gain-staging from the very beginning is essential
Step 3: Set up the oscillators
Four oscillators are required to shape the sound. Start with Osc 1. Change to a sinewave waveform, decrease to -1 octave, and increase to 0.00dB. This oscillator will serve as the sub bass.
Click the + button to add Osc 2. Change to a sawtooth waveform. Turn the detune knob slightly to the left so it is at approximately -0.070 semitones. Decrease the volume to -8.00 dB.
Click the + button to add Osc 3. It should remain as a sawtooth waveform. Turn the detune knob slightly to the right this time and set it to 0.070 semitones. Decrease the volume to -8.00 dB. Oscillators 2 and 3 now serve as the main body of the release sound.
Click the + button once more to add Osc4. Increase to 0 octaves. Increase Osc 4 sync to 4.00 and decrease the volume to -12 dB. This will add an interesting metallic texture to the sound.
Step 4: Filtering the sound
Begin by reducing the low-pass filter to 600 Hz. Hover over the filter 1 circle and then the three dots to bring up the filter options. Change the filter type to Metal. This will add extra grit and distortion to the filter.
Double-click on the display to add a second filter. Change this to Low Shelf and the filter type to Clean. Set the frequency to 30 Hz. As the low end is being boosted, keeping it as clean as possible is desired.
Increase the Filter Freq Offset to 3 octaves and the Filter Peak Offset to 40%. This will be modulated in the next step.
Finally, set the Filter Routing to Parallel. This is so each oscillator is fed through both filters independently and then mixed together.
Step 5: Modulating the filter
Press the Add Modulation button and choose New XLFO. Select 1/16 sync rate.
Then press the Add Modulation button again and choose New Envelope Generator. Increase the delay to 1714 milliseconds. This is calculated by taking the 60 (representative of seconds in a minute) and dividing by 140 (representative of the beats per minute). This will give the number 0.428 (representative of 1 beat) Times this by 4 (due to four beats per bar) for a delay time of 1.714 seconds.
Or use this site to work it out quickly! https://toolstud.io/music/bpm.php
Then change the attack to 3428 milliseconds (So the change occurs over two bars). Increase the sustain to 0 dB and the release time to 1 millisecond.
Route EG 2 to XLFO 1’s Level. Set the Level to 0 and bring up Slot Level to 1.000.
Then Route EG 2 to XLFO 1’s Glide. Set the Slot Level to 1.000 but use the minus button to invert the signal.
Finally, route the XLFO 1 Level to the Filter Freq Offset.
Step 6: Adding Chorus & Distortion
Turn on Chorus and change the amount to 60%. Change the mode to double. Slow the rate down to 0.005 Hz, set the depth to 100%, and increase the delay to 30.00 ms.
At this point, the volume on the channel will start to rise to over 0 dB, so decrease the Output Volume to -18 dB.
Load Saturn 2 onto the channel. Add a band split at 400hz.
On Band 1, select Warm Tube. Add 30% Drive, boost to 1 dB on the Bass slider, and increase the level to 3 dB. For Band 2, select Warm Tape. Add 65% drive and increase the level to 1 dB. Finally, decrease the Output to -3.0 dB.
Step 8. Applying Mid-Side EQ
Load Pro-Q 3 or an EQ with Mid-Side processing options. Add a 48 dB sloped lo-cut filter and place it at 20 Hz. Change the stereo placement to Mid.
Add a bell filter. Boost by 4 dB and place at 40 Hz. Again, change the stereo placement to Mid.
Finally, add another 48 dB sloped lo-cut filter, but place it at 80 Hz. Change the stereo placement to the Side. This will clear the low-end frequencies from the stereo field and boost them gently in the mono field.
Step 9: Compress the Bass
Add Pro-C 2 or a compressor of your choice. Select the preset Bass Control mk1 bM from the Mastering presets. Increase the Wet Gain to 25 dB.
Step 10: Add music for context
Add your favorite drums, vocals, and synth lines to bring them to life.
If you prefer the classic Reese bass sound, turn off Osc 4, change the filter routing to Serial, bypass the modulation, and lower the frequency of the cutoff to 200 Hz.
If you like the Twin 3, you can enjoy a variety of Twin 3 tutorials on Attack and YouTube.
[social-links heading=”Follow Attack Magazine” facebook=”https://www.facebook.com/attackmag” twitter=”https://twitter.com/attackmag1″ instagram=”https://www.instagram.com/attackmag/” youtube=”https://www.youtube.com/user/attackmag” soundcloud=”https://soundcloud.com/attackmag” tiktok=”https://www.tiktok.com/@attackmagazine”]