CD, CD Çalar, DVD, DVD Çalar, SACD, LP, Plak Çeşitleri ve Fiyatları

In today’s Synth Secrets we’re cooking up a gritty bass patch that would sound right at home in a jump up D&B track along the stylistic lines of artists like Amplify, Upgrade, or even more recent offerings from the venerable Chase and Status.
Several times along the way you’ll probably say “Yeah that sound works” and we could just stop there. But the synth we’re using – u-he’s Zebra 2 – is very deep and it allows us to take sharp turns in sound design as we add different synthesis elements and processing, and that’s what we’ll do. Really though, a seven-step tutorial only hints at the depth of Zebra’s capabilities.
Though “Serum” is the most common answer to the question “What softsynth would you use to build filthy bass for modern dance music,” one could argue that the correct answer is Zebra. Zebra’s unparalleled approach to warping waveforms makes it capable of producing a broad spectrum of really in-your-face tones, and the “performer” mode gives the producer instant access to real time control that’s hard to match with other synths, hardware or software. You’ll see this firsthand today if you haven’t used Zebra before.
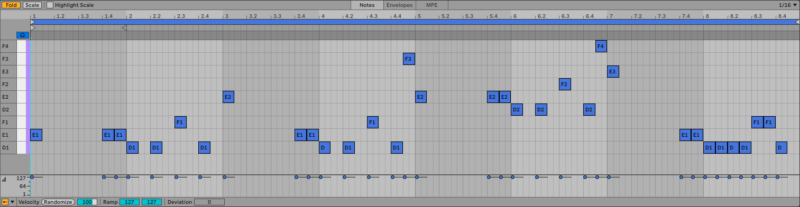
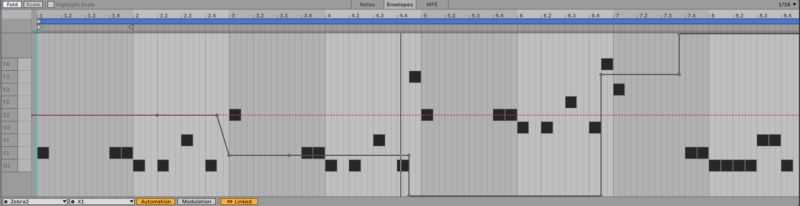
Let’s get started – set your DAW’s tempo to 174 and download a demo of Zebra if you’re not already a user so you can follow along. Use the following MIDI information to get where we’re going.
Here’s what we’re making today:
Remember – click any image to enlarge!
Step 1 – The Basics
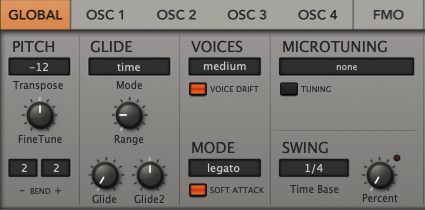
To get started, let’s initialize the patch from the preset selector. Then head to the global settings at the bottom left and set the voicing Mode to legato, then set glide to about 9 o’clock.
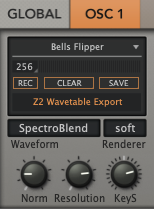
Now select the OSC 1 tab on the bottom and pick the first wavetable you see, entitled Bells Flipper. It’s got the funky harmonics that will help us get what we need from this patch.
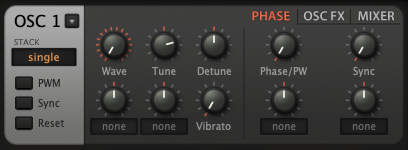
Now head to the OSC 1 module at top left and set the Tune to 24. That will move the pitch two octaves up; we’re setting it so high because we’re using it as an FM modulator rather than as the main tone. You’re not going to end up hearing oscillator one directly. The carrier, the main bass tone, will be produced by an FM oscillator we’ll create in a moment.
Now let’s give it a little volume contour by adding some attack and release to envelope 1.
Here are close up images of the changes we made and what it sounds like so far – don’t be scared, it won’t sound anything like this when we’re done.
Oscillator 2 – Carrier
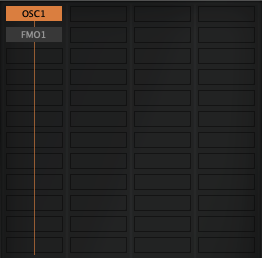
In the main grid in the center of the interface, click on an empty cell beneath the one currently labeled OSC1. Select FMO1 from the list of options. That gives you a new frequency modulation oscillator.
In Zebra, signal flows from the top to the bottom of the grid, and adding an FMO downstream for another oscillator makes the FMO the carrier – that is, the main tone – and sets the upstream oscillator up as a modulator – something that simply affects the FMO rather than making its own sound.
By default, FMO1 is just playing a deep sine wave. Here’s what it sounds like so far so you can be sure you’re tracking along with us. Get the head phones if you can’t hear on a laptop speaker or phone!
Step 3 – FM Modulation
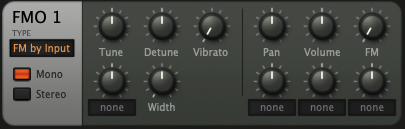
By default, FMO1’s FM knob is set to zero. That means that there’s no frequency modulation going on. Oscillator 1 isn’t doing anything at all right now because its only job is to modulate FMO1. You could turn the FM knob up to get a static value, but that’s not what we want. We’re going to modulate the FM amount using an envelope generator.
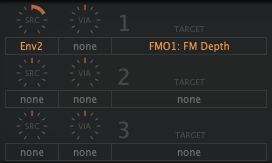
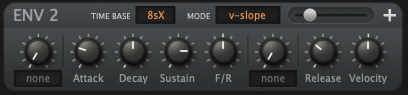
Click on the Matrix tab to grab the mod matrix. Now click on the field under the Src knob and select Env2. Turn the Src knob up to just over 2 o’clock. Click and drag from the Target field to the FM knob on FMO1. If you hit play now your patch should have a nasty buzz to it. Now head to the ENV 2 module, turn the attack up to 9 or 10 o’clock and give the release a similar setting, and now you’ve taken the front edge off that buzz. That’s just what we want.
Step 4 – Easily Change The Bass Tone
Great. We’ve got a very basic FM bass. Remember that Oscillator 1’s tune setting is set to 24, so it’s two octaves higher than FMO1, the oscillator that it’s modulating. While the MIDI is looping, experiment with different OSC1 tune settings. You’ll find that setting it to 0, 12, 24, 36, and 48 all yield great and usable tones with different harmonic sets.
So we’re going to make it really easy to switch between those values. That way you can change up the tone of the bass easily to add variation through your track.
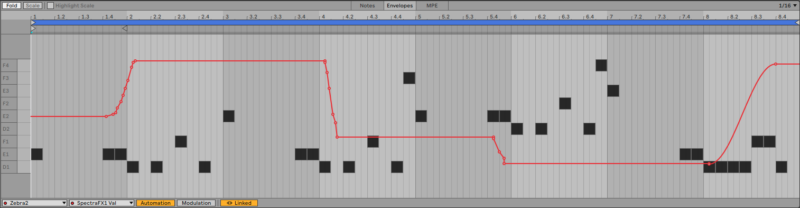
We will use Zebra’s awesome performance features for this trick. Click on the XY 1 tab towards the bottom right. Click and drag that first empty slot to OSC 1’s Tune knob to set the modulation target so modulation source X1 is set to OSC1: Tune. Now this is key… click and drag the little triangles (u-he calls these the Limit Markers) to the edges of the gray part of the range bar, and note that as you drag the triangles around you’ll see the value changing in the main display at top center. You need those little triangles to read exactly -24 and 24. When we do it correctly, we can turn X1’s knob all the way to the left or right to get really usable tones, and if we double-click on the X1 knob to set it back to zero, that’s another really usable tone.
Added bonus – setting X1’s value to -50 or 50 also lands on great sounds, so we have five bass tones in one on this patch.
I’ve done all this setup on my end and set up some modulation for the X1 knob so we can hear all the options we’ve got at our fingertips in rapid succession.

Step 5 – FM Shapeshifting
Now we’ve got the basic sound and a bunch of useful variations, and that’s great, but Zebra can do so much more. Zebra’s super power is warping sounds all the way down to the oscillator level. So let’s do a bit of that.
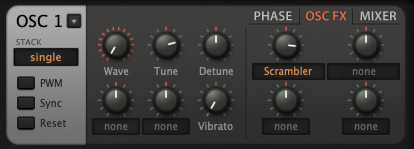
Head over to the OSC 1 module and click on the OSC FX tab on the top right side. In the first empty slot, select Scrambler. Now as the MIDI is looping, move this knob around. If you change values while notes are sounding, you get kind of a cool gritty thing, and if you just leave the knob static on any value other than zero you’ll just get another cool bass tone.
Let’s take a listen to what it can sound like if we jump around a bit. Definitely more subtle than some of the moves we made earlier but a nice flavor nonetheless.
Step 6 – Filter Frenzy
When’s the last time you went through a synth tutorial and got this far before you hit the filter section? Well, it’s that time…
Choose an empty slot in the main grid beneath FMO1, click on it, and select VCF1. We’re going to turn the cutoff way down, and then open up the mod matrix again and route envelope 3 to the filter cutoff frequency. Adjust the envelope to match what you see here and you’ll get something that’s a lot darker than what we had before.
Now, we’re going to brighten it up but where before we had something clean and brassy, now our bass is going to be filthy. Add Shape1 to an empty slot below our other modules, change the Type to Wedge, push the Input gain to 2 or 3 o’clock, and push the Depth up to halfway or more.
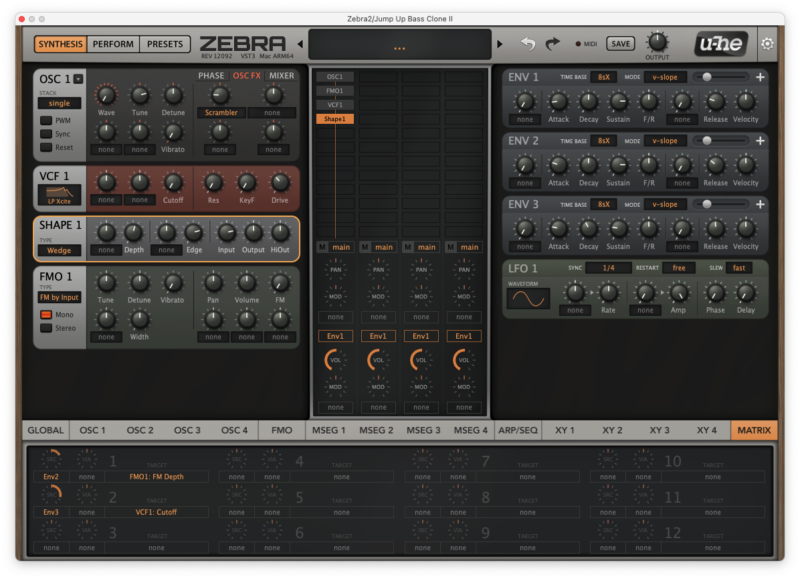
Using a really aggressive distortion, saturation, or waveshaper effect after a low pass filter that just barely opens enough to engage the distortion gives off a certain vibe. Let’s look at the whole patch we’re working on, and pay special attention to the settings of VCF 1, SHAPE 1, and ENV 3. Also note the settings in the mod matrix.
Step 7: Icing on the cake
To wrap things up, we’ll add some compression and reverb that give the whole thing a different kind of feeling. Click on the GLOBAL tab on the bottom left and let your eyes wander to the small grid that appears in the bottom center. This is the effects grid and the left column which has an inactive ModFX1 is the column that directly effects the master output of the synth.
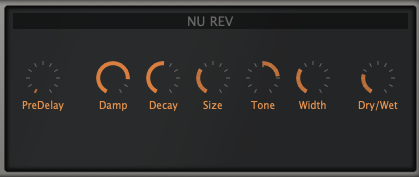
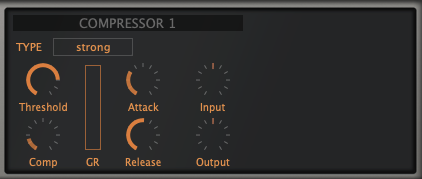
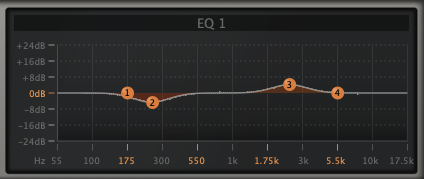
For starters, let’s select a slot beneath ModFX1 and add a NuRev reverb module. We’ll turn the size and width down just a touch. Then add Comp1 beneath that, change the mode the mode to Strong and adjust the Threshold and Comp values. Finally, add EQ1 to pull some of the tubbiness out around 250 Hz and give some bite around 2.5 kHz.
Take a look and a listen to the patch on it’s own:

And in context with some drums.
If you like this Synth Secrets you may enjoy the whole series on Attack or on YouTube.
Find out more about Zebra on the u-he website.
[social-links heading=”Follow Attack Magazine” facebook=”https://www.facebook.com/attackmag” twitter=”https://twitter.com/attackmag1″ instagram=”https://www.instagram.com/attackmag/” youtube=”https://www.youtube.com/user/attackmag” soundcloud=”https://soundcloud.com/attackmag” tiktok=”https://www.tiktok.com/@attackmagazine”]
[product-collection]
attackmagazine
In today’s Synth Secrets we’re cooking up a gritty bass patch that would sound right at home in a jump up D&B track along the stylistic lines of artists like Amplify, Upgrade, or even more recent offerings from the venerable Chase and Status.
Several times along the way you’ll probably say “Yeah that sound works” and we could just stop there. But the synth we’re using – u-he’s Zebra 2 – is very deep and it allows us to take sharp turns in sound design as we add different synthesis elements and processing, and that’s what we’ll do. Really though, a seven-step tutorial only hints at the depth of Zebra’s capabilities.
Though “Serum” is the most common answer to the question “What softsynth would you use to build filthy bass for modern dance music,” one could argue that the correct answer is Zebra. Zebra’s unparalleled approach to warping waveforms makes it capable of producing a broad spectrum of really in-your-face tones, and the “performer” mode gives the producer instant access to real time control that’s hard to match with other synths, hardware or software. You’ll see this firsthand today if you haven’t used Zebra before.
Let’s get started – set your DAW’s tempo to 174 and download a demo of Zebra if you’re not already a user so you can follow along. Use the following MIDI information to get where we’re going.
Here’s what we’re making today:
Remember – click any image to enlarge!
Step 1 – The Basics
To get started, let’s initialize the patch from the preset selector. Then head to the global settings at the bottom left and set the voicing Mode to legato, then set glide to about 9 o’clock.
Now select the OSC 1 tab on the bottom and pick the first wavetable you see, entitled Bells Flipper. It’s got the funky harmonics that will help us get what we need from this patch.
Now head to the OSC 1 module at top left and set the Tune to 24. That will move the pitch two octaves up; we’re setting it so high because we’re using it as an FM modulator rather than as the main tone. You’re not going to end up hearing oscillator one directly. The carrier, the main bass tone, will be produced by an FM oscillator we’ll create in a moment.
Now let’s give it a little volume contour by adding some attack and release to envelope 1.
Here are close up images of the changes we made and what it sounds like so far – don’t be scared, it won’t sound anything like this when we’re done.
Oscillator 2 – Carrier
In the main grid in the center of the interface, click on an empty cell beneath the one currently labeled OSC1. Select FMO1 from the list of options. That gives you a new frequency modulation oscillator.
In Zebra, signal flows from the top to the bottom of the grid, and adding an FMO downstream for another oscillator makes the FMO the carrier – that is, the main tone – and sets the upstream oscillator up as a modulator – something that simply affects the FMO rather than making its own sound.
By default, FMO1 is just playing a deep sine wave. Here’s what it sounds like so far so you can be sure you’re tracking along with us. Get the head phones if you can’t hear on a laptop speaker or phone!
Step 3 – FM Modulation
By default, FMO1’s FM knob is set to zero. That means that there’s no frequency modulation going on. Oscillator 1 isn’t doing anything at all right now because its only job is to modulate FMO1. You could turn the FM knob up to get a static value, but that’s not what we want. We’re going to modulate the FM amount using an envelope generator.
Click on the Matrix tab to grab the mod matrix. Now click on the field under the Src knob and select Env2. Turn the Src knob up to just over 2 o’clock. Click and drag from the Target field to the FM knob on FMO1. If you hit play now your patch should have a nasty buzz to it. Now head to the ENV 2 module, turn the attack up to 9 or 10 o’clock and give the release a similar setting, and now you’ve taken the front edge off that buzz. That’s just what we want.
Step 4 – Easily Change The Bass Tone
Great. We’ve got a very basic FM bass. Remember that Oscillator 1’s tune setting is set to 24, so it’s two octaves higher than FMO1, the oscillator that it’s modulating. While the MIDI is looping, experiment with different OSC1 tune settings. You’ll find that setting it to 0, 12, 24, 36, and 48 all yield great and usable tones with different harmonic sets.
So we’re going to make it really easy to switch between those values. That way you can change up the tone of the bass easily to add variation through your track.
We will use Zebra’s awesome performance features for this trick. Click on the XY 1 tab towards the bottom right. Click and drag that first empty slot to OSC 1’s Tune knob to set the modulation target so modulation source X1 is set to OSC1: Tune. Now this is key… click and drag the little triangles (u-he calls these the Limit Markers) to the edges of the gray part of the range bar, and note that as you drag the triangles around you’ll see the value changing in the main display at top center. You need those little triangles to read exactly -24 and 24. When we do it correctly, we can turn X1’s knob all the way to the left or right to get really usable tones, and if we double-click on the X1 knob to set it back to zero, that’s another really usable tone.
Added bonus – setting X1’s value to -50 or 50 also lands on great sounds, so we have five bass tones in one on this patch.
I’ve done all this setup on my end and set up some modulation for the X1 knob so we can hear all the options we’ve got at our fingertips in rapid succession.
Step 5 – FM Shapeshifting
Now we’ve got the basic sound and a bunch of useful variations, and that’s great, but Zebra can do so much more. Zebra’s super power is warping sounds all the way down to the oscillator level. So let’s do a bit of that.
Head over to the OSC 1 module and click on the OSC FX tab on the top right side. In the first empty slot, select Scrambler. Now as the MIDI is looping, move this knob around. If you change values while notes are sounding, you get kind of a cool gritty thing, and if you just leave the knob static on any value other than zero you’ll just get another cool bass tone.
Let’s take a listen to what it can sound like if we jump around a bit. Definitely more subtle than some of the moves we made earlier but a nice flavor nonetheless.
Step 6 – Filter Frenzy
When’s the last time you went through a synth tutorial and got this far before you hit the filter section? Well, it’s that time…
Choose an empty slot in the main grid beneath FMO1, click on it, and select VCF1. We’re going to turn the cutoff way down, and then open up the mod matrix again and route envelope 3 to the filter cutoff frequency. Adjust the envelope to match what you see here and you’ll get something that’s a lot darker than what we had before.
Now, we’re going to brighten it up but where before we had something clean and brassy, now our bass is going to be filthy. Add Shape1 to an empty slot below our other modules, change the Type to Wedge, push the Input gain to 2 or 3 o’clock, and push the Depth up to halfway or more.
Using a really aggressive distortion, saturation, or waveshaper effect after a low pass filter that just barely opens enough to engage the distortion gives off a certain vibe. Let’s look at the whole patch we’re working on, and pay special attention to the settings of VCF 1, SHAPE 1, and ENV 3. Also note the settings in the mod matrix.
Step 7: Icing on the cake
To wrap things up, we’ll add some compression and reverb that give the whole thing a different kind of feeling. Click on the GLOBAL tab on the bottom left and let your eyes wander to the small grid that appears in the bottom center. This is the effects grid and the left column which has an inactive ModFX1 is the column that directly effects the master output of the synth.
For starters, let’s select a slot beneath ModFX1 and add a NuRev reverb module. We’ll turn the size and width down just a touch. Then add Comp1 beneath that, change the mode the mode to Strong and adjust the Threshold and Comp values. Finally, add EQ1 to pull some of the tubbiness out around 250 Hz and give some bite around 2.5 kHz.
Take a look and a listen to the patch on it’s own:
And in context with some drums.
If you like this Synth Secrets you may enjoy the whole series on Attack or on YouTube.
Find out more about Zebra on the u-he website.
[social-links heading=”Follow Attack Magazine” facebook=”https://www.facebook.com/attackmag” twitter=”https://twitter.com/attackmag1″ instagram=”https://www.instagram.com/attackmag/” youtube=”https://www.youtube.com/user/attackmag” soundcloud=”https://soundcloud.com/attackmag” tiktok=”https://www.tiktok.com/@attackmagazine”]
[product-collection]