CD, CD Çalar, DVD, DVD Çalar, SACD, LP, Plak Çeşitleri ve Fiyatları

Hive 2 is beautiful. Its pads are beautiful. Let’s do this.
Today we will use u-he’s beautiful synth Hive 2 to create spacious, ambient pads that would be equally at home in a movie soundtrack, as a lush bed in a hazy summer house jam, or adding dimension a euphoric drum and bass track. Using only Hive 2 and the built-in effects we’ll get something beautiful that you can put your own spin on.
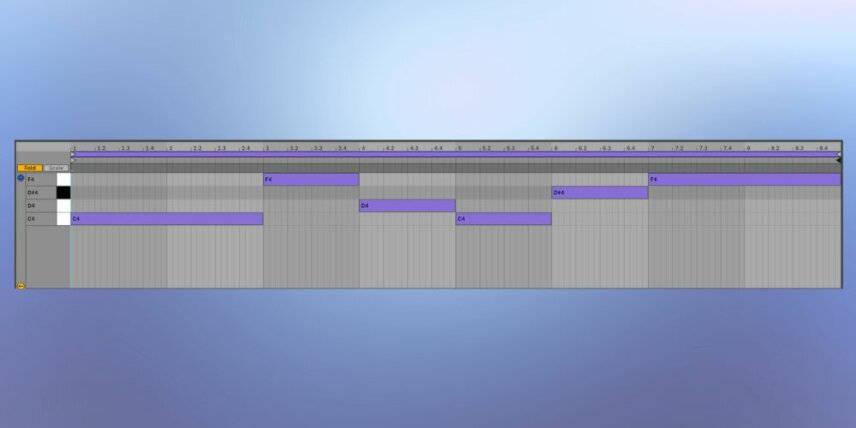
Set your DAW to 120 bpm, fire up an instance of Hive 2 (if you don’t own it you can grab a demo from the u-he website), and use the following simple MIDI clip to get started.
Remember – click any image to enlarge!
[advert]
Step 1: First things first
Right click on the preset browser up top and select init to initialize the patch.
Now rather than starting with any tone shaping, we’re going to start by programming a step sequenced arpeggio that is the heart of this patch.
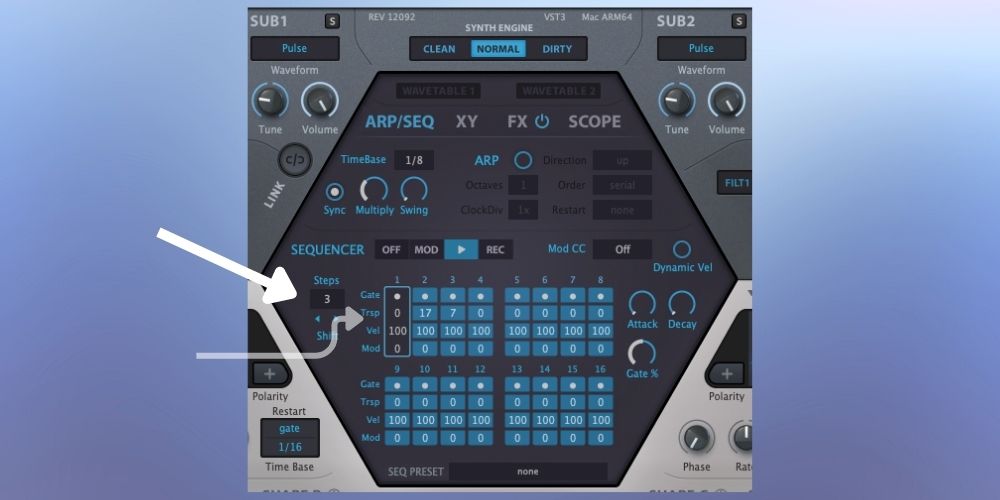
By default, you’ll be looking at the ARP/SEQ display in the middle of Hive 2 – now, in the SEQUENCER section, click the little play button to turn the sequence on, set the number of steps to 3, and set the transpose (labeled Trsp) to 0 for step 1, 17 for step 2, and 7 for step 3.
Hit a key on your MIDI controller and you should hear an arpeggio start to play.

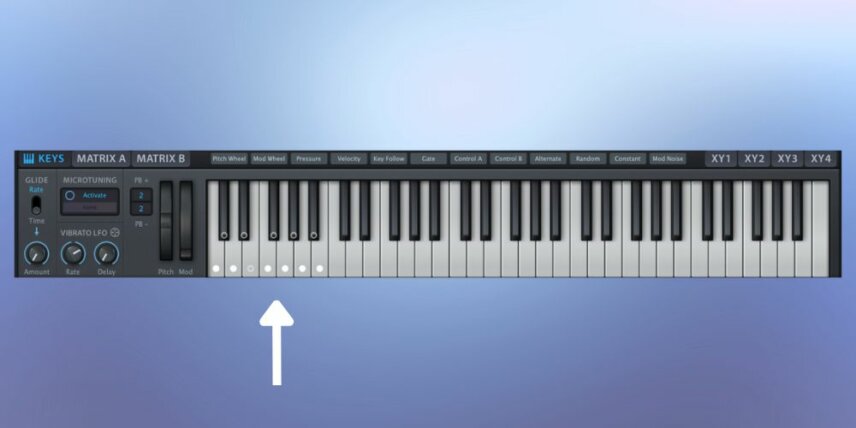
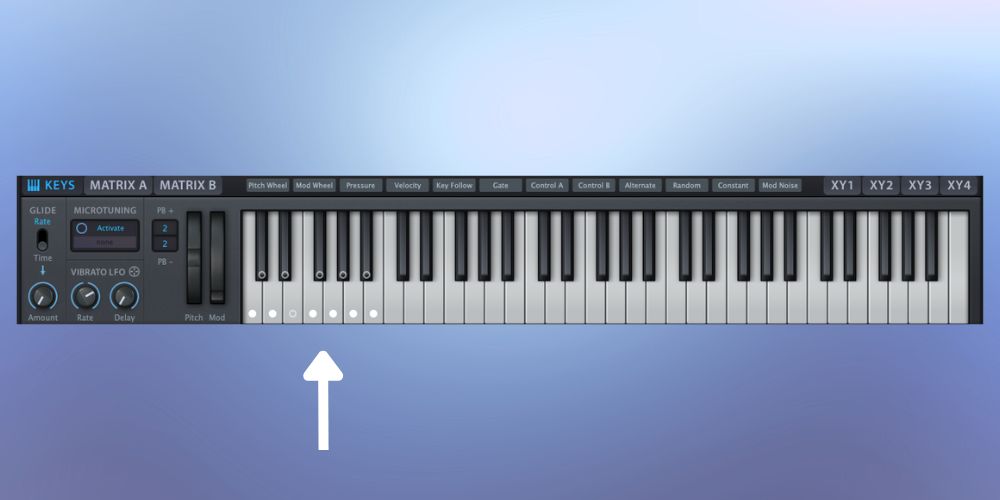
One fantastic feature of Hive 2 is its ability to conform all notes passing through it to a scale, eliminating sour notes completely. To activate this, simply click on the keys you would like Hive 2 to choose from when it’s playing.
For instance, if you want to always be in C major, activate all the white keys. Now you can’t play a wrong note! I will do something similar, activating all white keys except for the major third. Do the same, now play up and down the keyboard and you’ll see you never get a bad note.
Here’s our progress:
[advert]
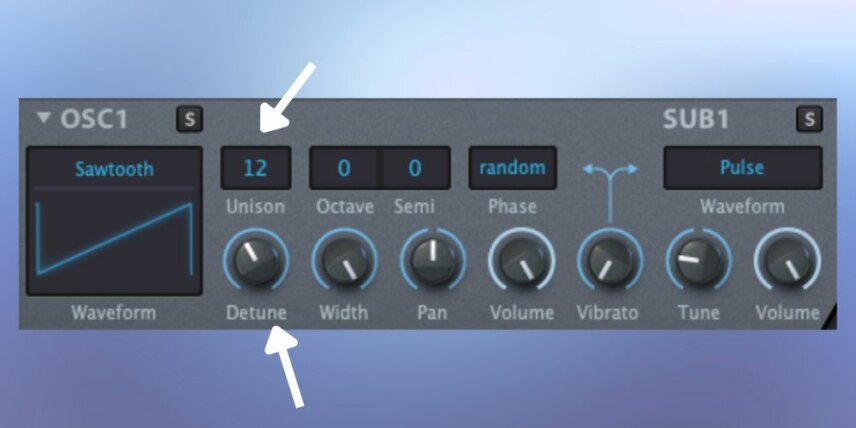
Step 2: Tonecrafting
Now let’s start on the sound itself. On oscillator 1, change the unison setting to 12, turn detune up to about 10 o’clock, then move down to the amplifier 1 section and turn the release slider up to about 50 percent. While we don’t have a pad yet, we have at least something euphonic.
[advert]
Step 3: Add space
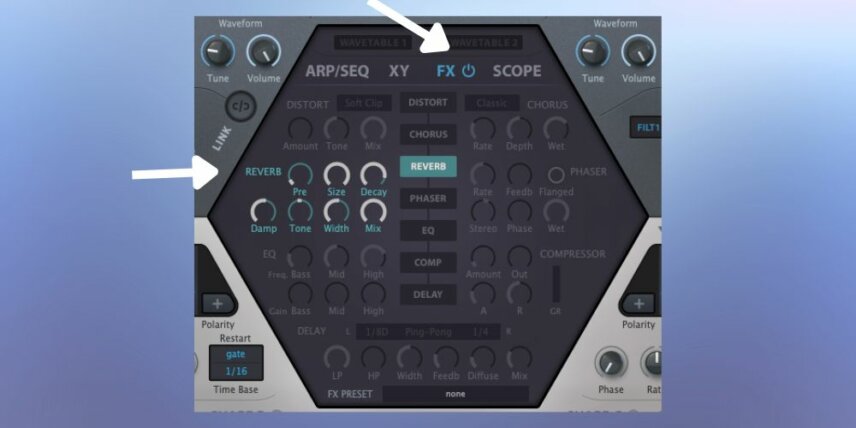
We don’t really have anything that resembles a “pad” yet, do we? No, and to get there we need to blur the edges of our tone with just a boatload of reverb.
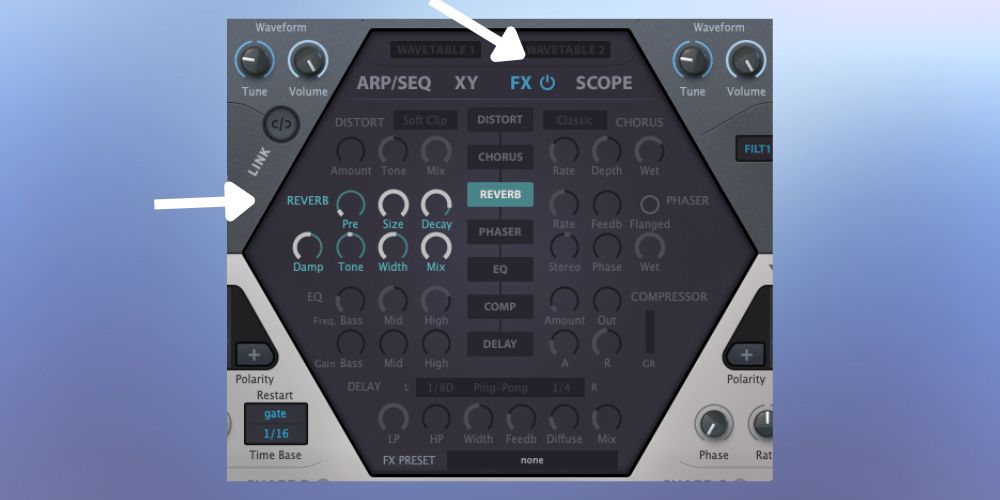
In the center of Hive 2’s interface, click FX to access the FX controls. Then click on REVERB and immediately crank the Size to max, the Decay to about 90 percent (not quite 100 or else our sound would linger eternally), pull Damp to 50, Width to 50, and Mix to 100 percent. Just drown the thing, and we have what we want.
[advert]
Step 4: Add depth
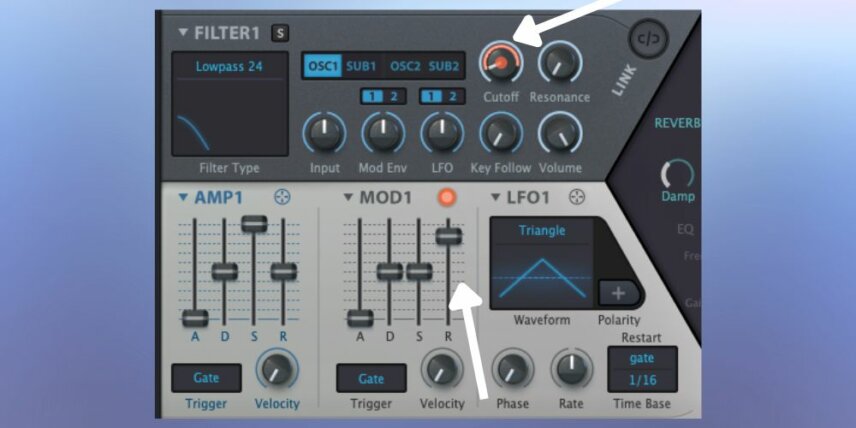
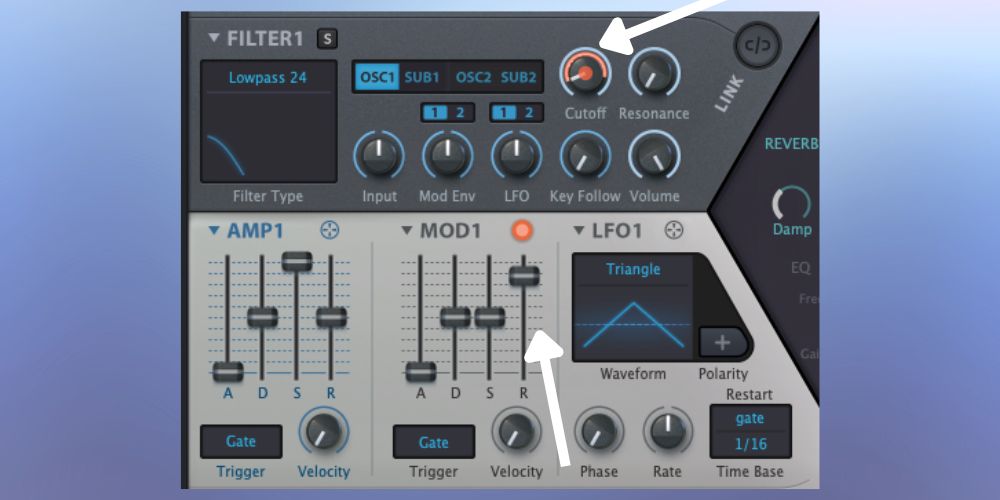
We want to bring filter 1 into the mix to give us a bit of depth, a bit of girth. First, increase the release on modulation envelope 1 (the slider labeled R in the MOD1 section) to about 90 percent. Then move over to the section labeled FILTER1 and pull the cutoff knob down to about 8 o’clock. Next, you’re going to click on the crosshair icon in the MOD1 section and drag it to the cutoff knob in the filter section. This routes mod envelope 1 to the filter cutoff.
Now click on the red dot in the center of the cutoff knob, drag it up until you have a red arc as pictured here. That illustrates the range that the modulation envelope will automate over. Though it’s hard to hear through the reverb, it certainly changes the vibe a bit.
[advert]
Step 5: Another voice
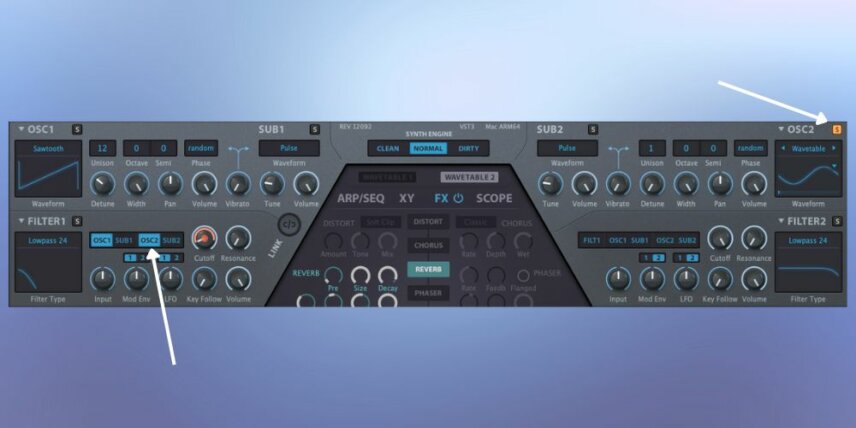
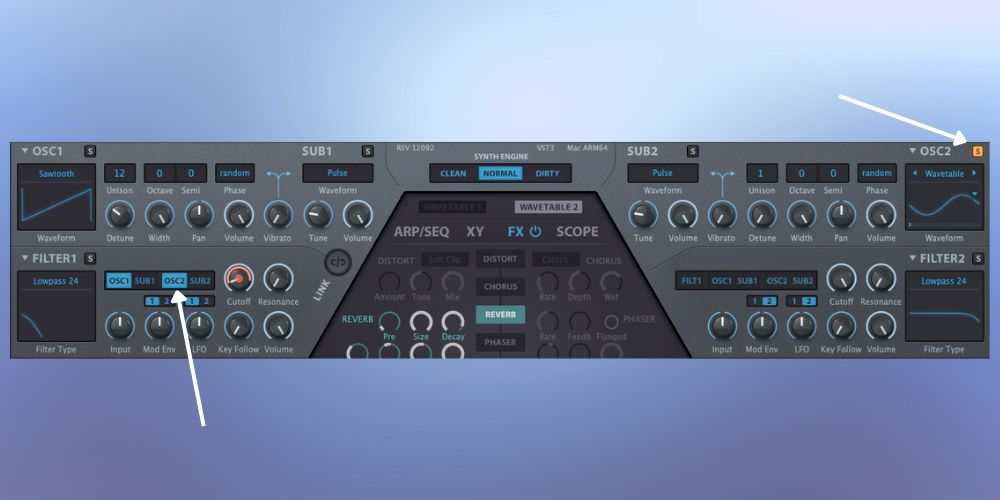
Now let’s activate oscillator 2. Filter 1 has a four channel mixer/source selector, and you’ll want to click the button labeled OSC2 in that section to bring Oscillator 2 into the mix. Now move over to the OSC2 section in the very top right hand corner – click the little S button to solo it, then click on the waveform name (by default it’s sawtooth) to open the waveform menu. Select Wavetable and keep the clicky little sine that it defaults to.
If you hit play now you’ll hear a more angelic kind of sound that’s a nice counterpart to the kind of ravey supersaw we have going on oscillator 1.
…It’s the motion of the ocean
[advert]
Step 6: Hive XY Superpowers
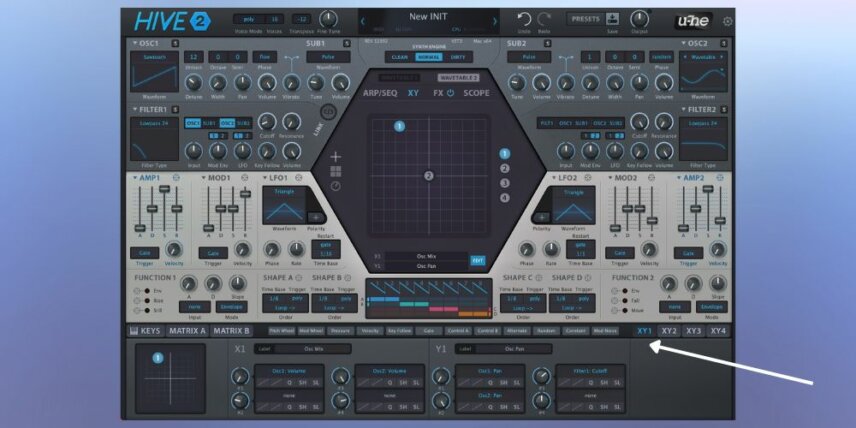
Now we’ll use one of Hive 2’s many superpowers; its XY control. Hive 2 makes it quite easy to map numerous parameters with different scaling to an XY pad, allowing simple and tactile control over a wealth of interactive sound-shaping tools.
On the bottom right hand corner of the interface, click on XY1 to look at the first XY controller. Notice it’s already mapped to a few parameters. We can unassign X1 from Sub1 and Sub2 volume.
We can also turn the scaling knob on oscillator 1’s volume all the way down and the scaling knob for oscillator 2 all the way up. This allows us to do a complete crossfade between oscillators by moving along the X axis of the XY control.
Moving the XY control around now gives us instant access to a palette of colors that, when changed over time, can add real drama to a piece of music.
When you bring in a beat and a bit of processing, including a synth bus compressor sidechained to the kick, you can hear where we’re going with this.
Try some of your own variations. Different oscillator settings, FX settings, and arpeggios can yield drastically different results. Have fun!
Be sure to check out other Synth Secrets while you’re here. You can read them on Attack.
[social-links heading=”Follow Attack Magazine” facebook=”https://www.facebook.com/attackmag” twitter=”https://twitter.com/attackmag1″ instagram=”https://www.instagram.com/attackmag/” youtube=”https://www.youtube.com/user/attackmag” soundcloud=”https://soundcloud.com/attackmag” tiktok=”https://www.tiktok.com/@attackmagazine”]
attackmagazine
Hive 2 is beautiful. Its pads are beautiful. Let’s do this.
Today we will use u-he’s beautiful synth Hive 2 to create spacious, ambient pads that would be equally at home in a movie soundtrack, as a lush bed in a hazy summer house jam, or adding dimension a euphoric drum and bass track. Using only Hive 2 and the built-in effects we’ll get something beautiful that you can put your own spin on.
Set your DAW to 120 bpm, fire up an instance of Hive 2 (if you don’t own it you can grab a demo from the u-he website), and use the following simple MIDI clip to get started.
Remember – click any image to enlarge!

[advert]
Step 1: First things first
Right click on the preset browser up top and select init to initialize the patch.
Now rather than starting with any tone shaping, we’re going to start by programming a step sequenced arpeggio that is the heart of this patch.
By default, you’ll be looking at the ARP/SEQ display in the middle of Hive 2 – now, in the SEQUENCER section, click the little play button to turn the sequence on, set the number of steps to 3, and set the transpose (labeled Trsp) to 0 for step 1, 17 for step 2, and 7 for step 3.
Hit a key on your MIDI controller and you should hear an arpeggio start to play.
One fantastic feature of Hive 2 is its ability to conform all notes passing through it to a scale, eliminating sour notes completely. To activate this, simply click on the keys you would like Hive 2 to choose from when it’s playing.
For instance, if you want to always be in C major, activate all the white keys. Now you can’t play a wrong note! I will do something similar, activating all white keys except for the major third. Do the same, now play up and down the keyboard and you’ll see you never get a bad note.
Here’s our progress:
[advert]
Step 2: Tonecrafting
Now let’s start on the sound itself. On oscillator 1, change the unison setting to 12, turn detune up to about 10 o’clock, then move down to the amplifier 1 section and turn the release slider up to about 50 percent. While we don’t have a pad yet, we have at least something euphonic.

[advert]
Step 3: Add space
We don’t really have anything that resembles a “pad” yet, do we? No, and to get there we need to blur the edges of our tone with just a boatload of reverb.
In the center of Hive 2’s interface, click FX to access the FX controls. Then click on REVERB and immediately crank the Size to max, the Decay to about 90 percent (not quite 100 or else our sound would linger eternally), pull Damp to 50, Width to 50, and Mix to 100 percent. Just drown the thing, and we have what we want.
[advert]
Step 4: Add depth
We want to bring filter 1 into the mix to give us a bit of depth, a bit of girth. First, increase the release on modulation envelope 1 (the slider labeled R in the MOD1 section) to about 90 percent. Then move over to the section labeled FILTER1 and pull the cutoff knob down to about 8 o’clock. Next, you’re going to click on the crosshair icon in the MOD1 section and drag it to the cutoff knob in the filter section. This routes mod envelope 1 to the filter cutoff.
Now click on the red dot in the center of the cutoff knob, drag it up until you have a red arc as pictured here. That illustrates the range that the modulation envelope will automate over. Though it’s hard to hear through the reverb, it certainly changes the vibe a bit.
[advert]
Step 5: Another voice
Now let’s activate oscillator 2. Filter 1 has a four channel mixer/source selector, and you’ll want to click the button labeled OSC2 in that section to bring Oscillator 2 into the mix. Now move over to the OSC2 section in the very top right hand corner – click the little S button to solo it, then click on the waveform name (by default it’s sawtooth) to open the waveform menu. Select Wavetable and keep the clicky little sine that it defaults to.
If you hit play now you’ll hear a more angelic kind of sound that’s a nice counterpart to the kind of ravey supersaw we have going on oscillator 1.
…It’s the motion of the ocean
[advert]
Step 6: Hive XY Superpowers
Now we’ll use one of Hive 2’s many superpowers; its XY control. Hive 2 makes it quite easy to map numerous parameters with different scaling to an XY pad, allowing simple and tactile control over a wealth of interactive sound-shaping tools.
On the bottom right hand corner of the interface, click on XY1 to look at the first XY controller. Notice it’s already mapped to a few parameters. We can unassign X1 from Sub1 and Sub2 volume.
We can also turn the scaling knob on oscillator 1’s volume all the way down and the scaling knob for oscillator 2 all the way up. This allows us to do a complete crossfade between oscillators by moving along the X axis of the XY control.
Moving the XY control around now gives us instant access to a palette of colors that, when changed over time, can add real drama to a piece of music.

When you bring in a beat and a bit of processing, including a synth bus compressor sidechained to the kick, you can hear where we’re going with this.
Try some of your own variations. Different oscillator settings, FX settings, and arpeggios can yield drastically different results. Have fun!
Be sure to check out other Synth Secrets while you’re here. You can read them on Attack.
[social-links heading=”Follow Attack Magazine” facebook=”https://www.facebook.com/attackmag” twitter=”https://twitter.com/attackmag1″ instagram=”https://www.instagram.com/attackmag/” youtube=”https://www.youtube.com/user/attackmag” soundcloud=”https://soundcloud.com/attackmag” tiktok=”https://www.tiktok.com/@attackmagazine”]